Deploying AMS in the cloud using AWS ParallelCluster
Introduction
AMS can run on most modern Linux platforms, which includes cloud servers. In this guide we will demonstrate how to set up a basic SLURM cluster on AWS, install AMS on it, and configure remote queues on your local machine in the AMS GUI.
Several cloud providers have supported tools for setting up a SLURM cluster in the cloud. This provides a useful mechanism for running batch workloads in a cloud environment, without need for much additional setup. It will allow you to use the powerful scheduling capabilities of SLURM in a setting where compute nodes are ephemeral and dynamically scaled up and down with demand to save on costs. AMSJobs, and PLAMS have integrated support for submitting jobs to a SLURM queue.
If you are interested in setting up an HPC cluster in the cloud, you could consider options from major cloud providers such as
In this guide we demonstrate how to use AMS on a Centos cluster on Amazon EC2, configured using AWS ParallelCluster. AWS ParallelCluster uses a relatively simple configuration file to set up a complicated CloudFormation stack capable of providing an automatically scaling HPC cluster, fully hosted on AWS EC2. The basic steps and some recommendations will be covered by this guide, but for advanced configurations we recommend checking the AWS documentation.
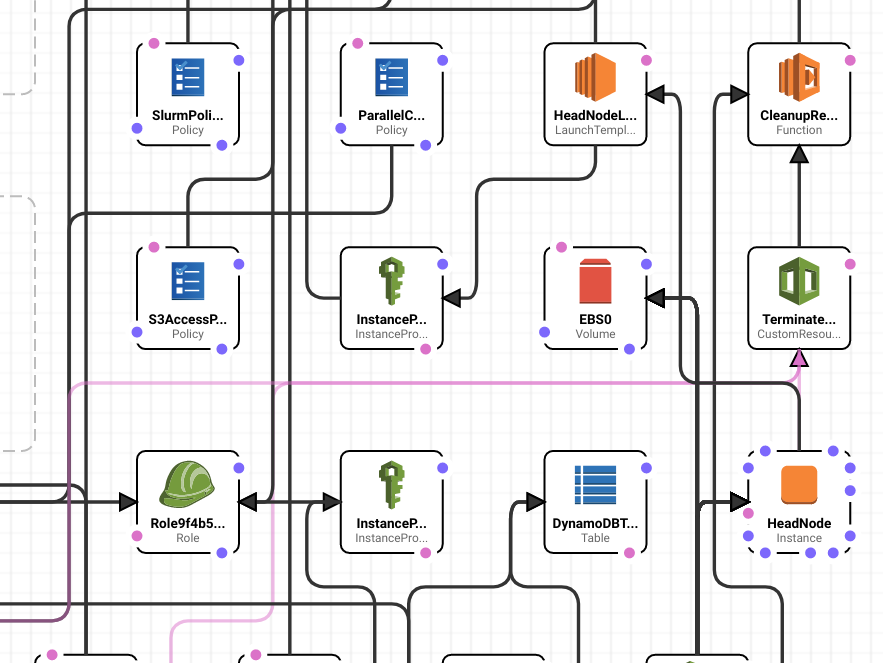
Fig. 1 AWS ParallelCluster sets up a CloudFormation stack to deploy all the resources you need to run your cluster on AWS automatically, and easily.
This guide is divided into the following steps.
- Installing and configuring the cluster
- We will cover some of the basic steps, and some configuration options that we recommend when running AMS.
- Installing and setting up AMS on the cluster
- Where to install AMS, and how to set up the environment so that it runs correctly.
- Configuring your local installation of AMS to connect to the cluster
- Setting up remote queues the correct way to use the SLURM cluster
The last part of the guide also will use an installation of AMS on your local machine, but it is not a prerequisite for using AMS on ParallelCluster.
Prerequisites
The following guide presumes that you have:
- An AWS account, and the AWS command line tools installed
- Familiarity with command line use, python, shell scripting, and SLURM.
- Installed python 3.6 or greater, and a recent version of Node.js (no javascript knowledge required)
- Some basic experience with AWS services such as EC2, S3, and IAM, and knowledge about good security practices
- An SSH key pair for EC2
- A cloud license for the version of AMS you wish to install. For questions regarding licenses, please email license@scm.com.
During this guide we will use several AWS services. It is important that your AWS account has permission to use these services. Make sure you have the right IAM permissions in order to successfully deploy the cluster.
Setting up your cluster with AWS ParallelCluster
Note
For the latest instructions and options for ParallelCluster, please check the AWS documentation
- If you have never set up a cluster on AWS parallelcluster before, this section will guide you through the process and will provide good starting point to run AMS.
- If you already have a working SLURM, Centos 7 cluster running on AWS, you can skim it for recommendations and continue to Installing and configuring AMS.
Installing ParallelCluster
AWS ParallelCluster is a command line tool that helps you deploy a dynamically scaling compute cluster on AWS. It provides a fairly simple way to run batch workloads in the cloud, also allowing software such as AMS to employ existing SLURM features.
- 1. Install the command-line tool using the instructions provided by AWS.
This guide is written for AWS ParallelCluster version 3. Note that you will require a recent version of python 3 (3.6 or greater), and a recent version of Node JS. These are dependencies of ParallelCluster. You will not need to write python or JS code as part of the setup. We highly recommend that you install ParallelCluster using python’s virtualenv. Keeping it inside a separate virtual environment will prevent other pip installations from breaking the tool, to make sure you can always manage any clusters that you may have deployed.
- 2. Run After installing ParallelCluster, make sure you can run it successfully with the following command:
(apc-ve) user@mymachine:~/aws$ pcluster version
{
  "version": "3.0.3"
}
Tip
You can also install AWS ParallelCluster into the AMS Python stack.
The pcluster tool will end up in a rather hidden location (in a Python virtual environment), but we can easily make a link to it in $AMSBIN:
$AMSBIN/amspython -m pip install aws-parallelcluster
ln -s $($AMSBIN/amspython -c "import os; print(os.environ['SCM_PYTHON_VENV'])")/bin/pcluster $AMSBIN/pcluster
$AMSBIN/pcluster version
After installing, we can configure a basic cluster.
Configuring ParallelCluster
Before you configure, make sure you already created an EC2 SSH key pair, as you will be asked to provide it. The configure command will run interactively, asking you to provide the basic information necessary to create your cluster. For more information, see the instructions provided by AWS. It is recommended to use this to create a template to work with, as it will automatically help you set up your cluster’s network, and select some other basic options. Here, we will tell you which recommended options to pick for the purpose of this guide.
- 1. Run the following configure command.using the
--configflag, you can select a different name for the configuration file if preferred.
(apc-ve) user@mymachine:~/aws$ pcluster configure --config cluster-config.yaml

INFO: Configuration file cluster-config.yaml will be written.
Press CTRL-C to interrupt the procedure.
- 2. Select the region you want to host the cluster in. This may depend on your own location, or the location of resources you want to connect to the cluster.
Allowed values for AWS Region ID:
1. ap-northeast-1
2. ap-northeast-2
3. ap-south-1
4. ap-southeast-1
5. ap-southeast-2
6. ca-central-1
7. eu-central-1
8. eu-north-1
9. eu-west-1
10. eu-west-2
11. eu-west-3
12. sa-east-1
13. us-east-1
14. us-east-2
15. us-west-1
16. us-west-2
AWS Region ID [eu-central-1]:
- 3. Select the key name you want to use for connecting to the cluster.
Allowed values for EC2 Key Pair Name:
1. mykey
2. otherkey
EC2 Key Pair Name [mykey]: 1
Make sure you have this key available on the machine you will use to connect to the cluster. Next, you will need to select a scheduler.
- 4. Please select SLURM as the scheduler.
Allowed values for Scheduler:
1. slurm
2. awsbatch
Scheduler [slurm]: 1
- 5. Please select Centos 7 as the operating system.
Allowed values for Operating System:
1. alinux2
2. centos7
3. ubuntu1804
4. ubuntu2004
Operating System [alinux2]: 2
At the time of writing this guide, AWS ParallelCluster only supports installing Intel HPC software on Centos 7. Therefore we highly recommend using Centos 7, which will provide advantages for running parallel jobs. Details about parallel jobs will be covered later in this guide.
Next, we need to select a head node instance type. Even though you should not be running compute jobs on the head node, you will still need a decent amount of processing power to run the SLURM cluster and manage the network. You should also make sure to select an instance type that has a decent network bandwidth, since most network connections are routed through the head node.
- 6. Select a head node type. For this guide we are using a
c5.2xlarge.
Head node instance type [t2.micro]: c5.2xlarge
In the next step, a compute queue is defined. This queue contains a set of compute resources (EC2 instance types), and some configuration options for each resource.
- 7. Set up 1 queue. Call it
queue1For this guide we will set up one queue at this step.
Number of queues [1]: 1
Name of queue 1 [queue1]: queue1
- 8. For this queue, please choose 1 compute resource, and use c5n.xlarge as instance type. Leave the maximum at 10.
Number of compute resources for queue1 [1]:
Compute instance type for compute resource 1 in queue1 [t2.micro]: c5n.xlarge
Maximum instance count [10]:
The number of compute resources refers to the number of different instance types.
As an example, we are using only c5n.xlarge instances, with a Maximum count of 10.
These are Intel based, and have 2 cores with 8 GB of memory.
When choosing instance types please note that the number of cores typically is only half the number of vCPUs.
For optimal use of resources disabling simultaneous multithreading (known as hyper-threading on Intel platforms) is recommended, so that only one thread runs per core.
Next up is the network configurations.
- 9. Select a VPC, or automate creation of a new one.If you already have a Virtual Private Cloud (VPC), you can use the one that already exists.If you are unsure which to use or don’t have a VPC, the configure tool can generate a VPC for you.
Automate VPC creation? (y/n) [n]:
Allowed values for VPC ID:
  #  id            name      number_of_subnets
---  ------------  ------  -------------------
  1  vpc-3213910c  vpc1                      5
VPC ID [vpc-3213910c]: 1
For more information about VPCs on AWS, please read the AWS documentation on the subject. Next up, you will need to define subnets both for the head node and the compute nodes. Automating this is easy, select an availability zone and configuration.
- 10. For this guide Automate subnet creation.Select whichever you prefer and continue.Note that using a private subnet will create a NAT gateway, which could incur some extra costs.
Automate Subnet creation? (y/n) [y]:
Allowed values for Availability Zone:
1. eu-central-1a
2. eu-central-1b
3. eu-central-1c
Availability Zone [eu-central-1a]: 1
Allowed values for Network Configuration:
1. Head node in a public subnet and compute fleet in a private subnet
2. Head node and compute fleet in the same public subnet
Network Configuration [Head node in a public subnet and compute fleet in a private subnet]: 2
That should be the last step in the configuration. Next, a CloudFormation stack will be created for your network configuration. Note that this is different from the stack that will be used to deploy the cluster. That stack won’t be created until later.
- 11. Wait until the stack generation is finished.
Creating CloudFormation stack...
Do not leave the terminal until the process has finished.
Stack Name: parallelclusternetworking-pubpriv-20210923123456 (id: arn:aws:cloudformation:eu-central-1:112233445577:stack/parallelclusternetworking-pubpriv-20210923123456/21615d90-2059-11ec-b5c3-02cac9daa27a)
Status: parallelclusternetworking-pubpriv-20210923123456 - CREATE_COMPLETE
The stack has been created.
Configuration file written to cluster-config.yaml
You can edit your configuration file or simply run 'pcluster create-cluster --cluster-configuration cluster-config.yaml --cluster-name cluster-name --region eu-central-1' to create your cluster.
At this point, you have a basic configuration file from which you could launch a cluster. However, it will need some editing to add some options that will make it easier to use AMS effectively.
To continue configuring, open the configuration file in a text editor.
In this example we called the file cluster-config.yaml.
Your basic cluster file will look something like this:
Region: eu-central-1
Image:
  Os: centos7
HeadNode:
  InstanceType: c5.2xlarge
  Networking:
    SubnetId: subnet-0bd780a5354103
  Ssh:
    KeyName: mykey
Scheduling:
  Scheduler: slurm
  SlurmQueues:
  - Name: queue1
    ComputeResources:
    - Name: c5nxlarge
      InstanceType: c5n.xlarge
      MinCount: 0
      MaxCount: 10
    Networking:
      SubnetIds:
      - subnet-0bd780a5354103
In the next few subsections, we will provide recommendations for a lot of the individual options. These will allow you to use AMS more effectively on your cluster. If something is optional, it will be indicated as such.
Defining queues
The configuration tool will have guided you through the definition of at least one compute queue for use.
Inside the configuration file you will find the Scheduling section, and within the SlurmQueues section.
Under the ComputeResources section, you can define different types of compute nodes.
Each compute resource will require an instance type and a name. You can also setup
a minimal and maximal number of instances.
One setting you should add to your compute resource is the DisableSimultaneousMultithreading: true, which will disable hyper-threading on your compute nodes.
- Please Add DisableSimultaneousMultithreading: true key to your compute resource.
Here is an example of a queue setup with one on-demand queue, and hyper-threading disabled on its compute resource. You can add as many as 10 queues, and 5 compute resources per queue.
SlurmQueues:
- Name: queue1
  CapacityType: ONDEMAND
  ComputeResources:
  - Name: c5nxlarge
    InstanceType: c5n.xlarge
    DisableSimultaneousMultithreading: true
  Networking:
    SubnetIds:
    - subnet-0bd780a5354103
Tip
Internode communication speed is crucial for running MPI jobs across multiple devices. If you wish to run multinode jobs effectively you should look into using the Elastic Fabric Adapter (EFA) option in your configuration. This will limit your choice of instance types, but allow for much faster multinode jobs.
In this guide, we will not use Elastic Fabric Adapter (EFA). Therefore, the configuration presented here is mostly useful for single-node jobs.
IntelMPI
To ensure smooth operation of multi-core jobs on SLURM, IntelMPI is required.
AMS ships with a version of IntelMPI, but for best experience you can opt to install Intel HPC software with your cluster.
This is done using the AdditionalPackages section of the configuration file.
- Add the following AdditionalPackages section to your configuration file.
AdditionalPackages:
IntelSoftware:
IntelHpcPlatform: true
At the time of writing this guide, ParallelCluster only supports installing Intel HPC software on Centos 7.
Optional: Security groups
Your cluster should only be accessible by those that have the private key that you provided.
By default, ParallelCluster will configure a security group that allows access from all IPv4 addresses (0.0.0.0/0).
For increased security, you may also like to restrict access to known IP-addresses.
In the Ssh section, you will already find the KeyName that points to the ssh key you provided.
You can add the additional AllowedIps key to this section, and specify ip ranges using CIDR notation.
Below here is an example of how to restrict a specific ip address, or a range of addresses.
HeadNode:
....
Ssh:
KeyName: mykey
AllowedIps:
- 12.34.123.0/24 # all office machine
- 12.34.124.123/32 # specific machine
Optional: GUI access with NiceDCV
AWS ParallelCluster can install a NiceDCV server on your head node, in order to provide a graphical environment.
In the already defined HeadNode section,add a new Dcv section, and a key Enabled: True (see also the example below).
You can also set the AllowedIps using CIDR notation to restrict access to specified IP ranges.
HeadNode:
....
Dcv:
Enabled: true
AllowedIps: 12.34.123.234/32
Note that to use the GUI for AMS you will also need to install GUI dependencies.
You will also need to run the GUI in software openGL mode, using by setting SCM_OPENGL_SOFTWARE=1 in your environment before starting up GUI programs.
On a Centos system, you can use yum to install packages. Of course, your cluster needs to be running during the time of installation. You can also put yum commands in a bootstrap script to run on the headnode during the cluster startup phase.
sudo yum install -y \
libXScrnSaver \
libxkbcommon-x11 \
fontconfig \
freetype \
libdrm \
libICE \
libSM \
libstdc++ \
libX11 \
libXau \
libXdmcp \
libXext \
libXft\
libXrender \
libXt \
libXxf86vm \
mesa-libGL \
mesa-libGLU
You should not need these packages on the compute nodes, assuming you will never run graphical programs on those.
Creating the cluster
This concludes the basic configuration of the cluster. At this point you should have finished creating your cluster configuration as a yaml file. Make sure you have taken a little time to read the best practices as well.
Next, the cluster can be started.
In order to start the cluster, you need to use pcluster create-cluster.
This will deploy a CloudFormation stack that contains all your cluster components.
You need to provide a cluster name, and the path to your configuration file.
pcluster will validate your configuration file first, and if valid it will start your cluster.
- Start the cluster using the create-cluster subcommand
pcluster create-cluster --cluster-name ams-cluster --cluster-configuration cluster-config.yaml
If you run into any errors with the configuration file, look if any manually added keys are in the right section of the file and that you used correct YAML syntax. A full specification of the configuration format is available online.
The cluster will be created through a CloudFormation stack which has the same name as the cluster.
This will take a while.
You can follow progress through the CloudFormation console.
If any errors occur, you can see them there.
Common errors may include a lack of permissions to create resources.
You can also follow progress on the command-line with the pcluster describe-cluster command.
- Follow progress using the following command
pcluster describe-cluster --region eu-central-1 --cluster-name ams-cluster
If your cluster fails to create due to permission errors, please talk to your AWS account administrator about IAM permissions.
After it is done, it will list "clusterStatus": "CREATE_COMPLETE".
Connecting to the head node
If your cluster has reached CREATE_COMPLETE status, you should now be able to ssh to your cluster.
An easy way to do this is using
pcluster ssh --region eu-central-1 --cluster-name ams-cluster -i ~/.ssh/mykey.pem
Alternatively, you can look up the head node in the EC2 dashboard.
If you opted to install a DCV server, you can also connect with NiceDCV. An easy, one line way to connect is
pcluster dcv-connect --region eu-central-1 --cluster-name ams-cluster --key-path ~/.ssh/mykey.pem
Next you can install AMS on the cluster.
Deleting the cluster
If in the future you wish to shutdown the cluster, you can use the pcluster delete-cluster command.
pcluster delete-cluster --region eu-central-1 --cluster-name ams-cluster
Keep in mind that storage systems containing your data may be deleted if they were newly defined through the cluster configuration file. If you wish to change this behavior, you can check the information about shared storage in the AWS documentation.
Installing and configuring AMS
You can follow the basic instructions in the installation guide, while taking a few caveats in mind. We will summarize the main steps here for convenience, and help you correctly use AMS with IntelMPI and SLURM.
Since you need access to AMS on the compute nodes, it is important to install it on a filesystem that is shared between the compute and head nodes.
In the cluster configuration we defined the shared-ebs EBS filesystem.
Please go into that directory, and download and extract AMS there.
- 1. Download and extract the AMS tarball.
cd /shared-ebs
URL=https://downloads.scm.com/Downloads/download2022/bin/ams2022.101.pc64_linux.intelmpi.bin.tgz
CREDS=u12345:myscmpassword
curl -u "$CREDS" -sL "$URL" | tar xz
If you have configured a different storage location, extract the tarball in a folder there. This command downloads and extract the binaries in a single step by using curl and tar. You will have to provide your SCM login details. Depending on which instance types you use, always use an appropriate set of binaries to match your CPU types. Here, we opted to use the AMS binaries that are optimized for Intel CPUs. If you use AMD-Zen based instances, you will want to download the version of AMS compiled with optimizations for AMD.
You will also have to set up the environment, both on your head and compute node.
Inside the AMS installation folder (typically named something like ams2022.101) you will find the Utils folder.
There, you can find a template amsrc.sh script, but it will require some editing.
- 2. Make a copy of the
$AMSHOME/Utils/amsrc.shscript to somewhere on your shared filesystem, for instance in the top directory of the installation.
To distinguish it from other scripts such as $AMSHOME/amsbashrc.sh (which you should not use on AWS), you could call it something like cloudrc.sh.
cd /shared-ebs/ams2022.101
cp Utils/amsrc.sh ./cloudrc.sh
Edit the AMSHOME variable to point to the top folder containing your installation on the shared filesystem.
- 3.
AMSHOME=/shared-ebs/ams2022.101
If in your configuration you have defined a high performance scratch filesystem,
you can set the SCM_TMPDIR variable to point to it as well.
You may wish to set the SCM_PYTHONDIR to somewhere in the shared filesystem.
That way if you need to install any additional python packages, you only
have to do it once.
Remove the SCMLICENSE line, as it is not used in cloud environments.
Instead, add a line with your SCM_CLOUD_CREDS which will allow the software to locate your license over the internet.
Don’t forget to export this additional variable. Save the file when you’re done.
- 4. Delete the
SCMLICENSEline5. Add a lineexport SCM_CLOUD_CREDS=u12345:myscmpassword6. Save the file.7. Make sure you can source the file without error, usingsource cloudrc.sh.
Remember that before running any jobs, you will need to source this file.
You can add it to your prolog command in AMSJobs remote queue command, which will be covered later on.
Next, we need to check if your license works correctly.
- 8. run the
dirac TARGET, to check that the cloud license works for your target.
For instance if you want to use ADF, call the dirac ADF command.
If this returns an error check your credentials carefully.
Also check the spelling of the target which is case sensitive.
If you don’t have a valid license you will see a message such as “Your license does not include module ADF version 2022.101 on this machine”.
For information and support regarding licenses please contact license@scm.com.
Configuring IntelMPI and SLURM
AMS is capable of running jobs in parallel, both across processor cores and several instances by using IntelMPI.
In order to use AMS with both IntelMPI with SLURM, some configuration is needed.
Specifically, the I_MPI_PMI_LIBRARY environment variable needs to point to a valid path, containing the file libpmi.so.
On the AWS parallelcluster, you can find libpmi.so under /opt/slurm/lib/libpmi.so.
- 1. Edit your
cloudrc.shscript, add a line that saysexport I_MPI_PMI_LIBRARY=/opt/slurm/lib/libpmi.so
If you opted to install IntelMPI as part of your cluster, you will need to tell AMS to use it.
First, to use the IntelMPI installation that comes installed on the AWS cluster you will have to load the intel mpi module. This needs to be done before every job.
module load intelmpi
You will also need to export SCM_USE_LOCAL_IMPI=1 inside your environment at run time.
To make it simpler, you can put both the export, and module load commands inside the cloudrc.sh script.
- 2. add a new line to the
cloudrc.shscript created earlier:module load intelmpi3. Add another line sayingexport SCM_USE_LOCAL_IMPI=1, to tell AMS to use the Intel MPI version installed on the cluster itself. Save and close the file.
You should now be ready to run AMS jobs in parallel on your cluster.
Your final cloudrc.sh may look something like the example below:
click to hide/show example
#!/bin/sh
# This file should be sourced by a bourne shell (sh), bash shell (bash), or z-shell (zsh).
# AMSHOME refers to the folder that contains the folders "bin", "atomicdata", "scripting" and a few others
AMSHOME=/shared-ebs/ams2022.101
# SCM_TMPDIR is used for writing temporary data during calculations. For best performance, this needs to be fast&local storage (no network mount).
SCM_TMPDIR=/tmp
# SCM_PYTHONDIR should point to the location where you want the SCM python stack to set up the virtual environment.
# This is for installing additional python packages from PyPi with "amspython -m pip install"
SCM_PYTHONDIR=$HOME/.scm/python
# SCM_CLOUD_CREDS should contain your license credentials from SCM.
export SCM_CLOUD_CREDS=u12345:password
# MPI settings for AWS ParallelCluster on Centos 7
module load intelmpi
export I_MPI_PMI_LIBRARY=/opt/slurm/lib/libpmi.so
export SCM_USE_LOCAL_IMPI=1
# Variables below this line usually do not need to be changed
AMSBIN="$AMSHOME"/bin
AMSRESOURCES="$AMSHOME"/atomicdata
export AMSHOME AMSBIN AMSRESOURCES SCM_TMPDIR SCMLICENSE SCM_PYTHONDIR
# add $AMSBIN to the PATH
PATH="$AMSBIN":"$PATH"
export PATH
Using the queues on your local AMS installation
In this section, it will be explained how to use queues both through your local installation of AMS, and by running on the head node.
To use your cluster from a local installation of AMS, in principle you just need to follow the instructions for AMSJobs.
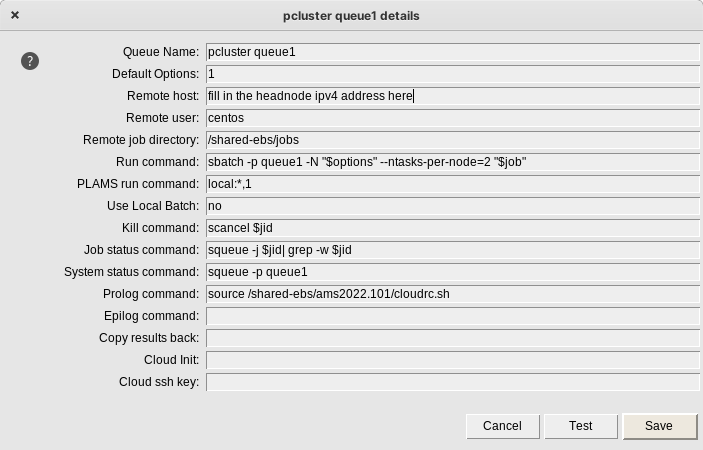
Fig. 2 Configuring your queue in AMSjobs requires you to fill in a few options.
From AMSJobs select Queue >> New >> SLURM.
Queue name: Give the queue a name which will be used inside AMSjobs to refer to it, for instance pcluster queue1.Default options: leave it at1Remote host: Fill in the public Ipv4 address of your cluster’s Head Node. You can find this in the EC2 console. Alternatively, you can use thepcluster sshcommand to connect, as it will also tell you the hostname when you log in.Remote user: For centos 7 clusters the username should becentos.- The
Remote job directoryshould point to somewhere on a shared filesystem, such as ashared-ebs/jobs. The GUI will copy jobs to the head node. Run command: Jobs should be submitted usingsbatchcommand. Next, some options are needed-p queuename, The name of your queue, such asqueue1, should be entered here.- the
-Nflag should be used for specifying how many nodes. - the
--ntasks-per-node=Xflag should be specified to match the number of cores (not vCPUs!) on the instance type. - If you want to mix different instance types in one queue, and request a specific instance type, use the
-C flag.for instance,-N 3 -C "[c5.xlarge*1&t2.micro*2]"will give you three instances, onec5.xlargeinstance, and twot2.microinstances
Use local batchno.Kill command: Use the default setting (scancel $jid)Job status command: Use the default setting (squeue -j $jid| grep -w $jid)System status command: Add the name of your queue. For examplesqueue -p queue1.Prolog command: Source your cloudrc.sh script here:source /shared-ebs/ams2022.101/cloudrc.sh
Cloud ssh key: Leave this empty. You should use an SSH agent to provide your SSH key to AMSjobs. The “path to private key” field is not supported for SLURM configurations. On Linux/MacOS you can use ssh-add, or create a configuration in your$HOME/.ssh/configfile that uses your AWS key file. On Windows you can use pageant. Please see the detailed SSH instructions in the installation manual for more information.
Other fields you can also leave empty.
Save the queue. After that, you can use the queue to submit jobs.
Considerations
The configuration options provided in this guide are a simple and easy way to get started. We provided a configuration that is mostly useful for those running single-node jobs, and only mount a small filesystem. In production you will find that you need different options for filesystems, compute instance types and network configuration.
If you want to run multi-node jobs, consider using Elastic Fabric Adapter.
If your cluster will be active for a long time, and you wish to write many jobs, consider using a proper file system like an elastic file system (EFS) , FsX for Lustre filesystem.
There are many more options available. Please see the official AWS documentation for an up to date overview.
Appendix
Monitoring the cluster
AWS ParallelCluster will create a CloudWatch dashboard to monitor your cluster. There you can see information such as CPU, disk, and network usage.
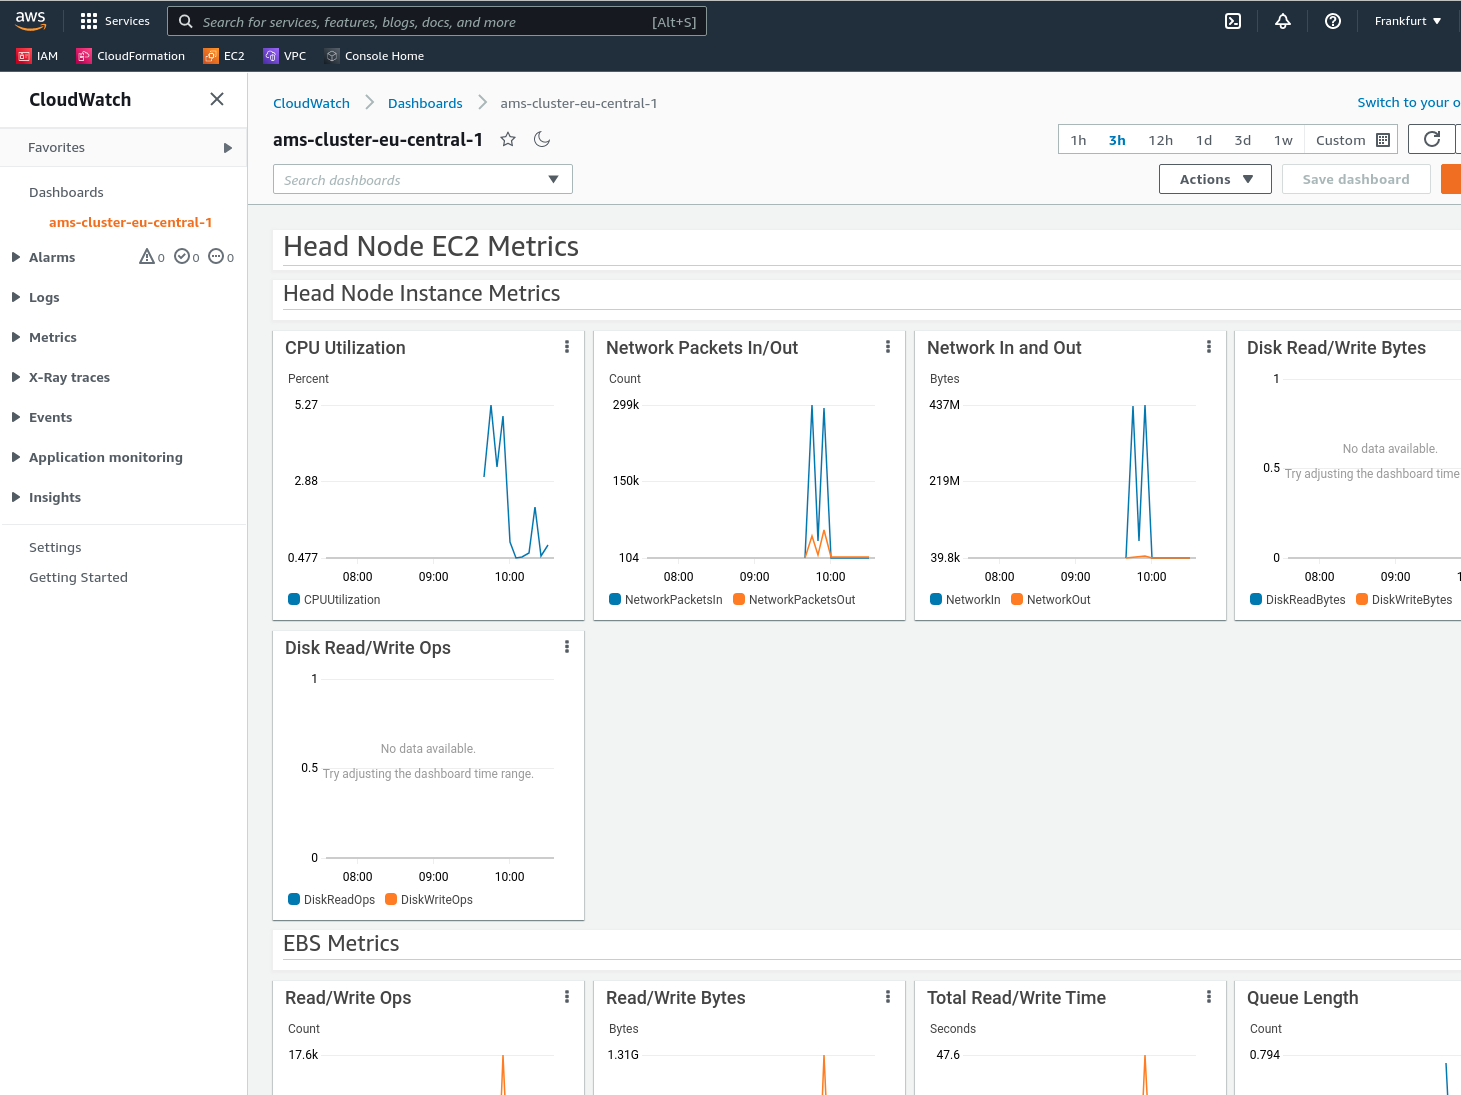
Fig. 3 The cloudwatch dashboard visualizes useful system information about your cluster.
Debugging issues
ParallelCluster uses CloudFormation to deploy all the different AWS resources that are needed.
If something goes wrong during some stage of the deployment, it will automatically start rolling back changes.
This can make it difficult to debug sometimes.
To aid in debugging, provide the --rollback-on-failure to the pcluster create-cluster command.
This will prevent the rollback procedure.
You can then use the Cloudformation console to inspect your stack, and see what went wrong.
An example cluster
Here is an example of a fully configured cluster. It defines both an on-demand, and a spot queue. The head node has DCV installed, and SSH and remote GUI access are restricted to pre-configured IP-addresses. The head node is configured with a custom bootstrap script present in an S3 bucket, and the cluster has read-only access to said bucket. The bootstrap script installs AMS, and also installs GUI dependencies on the head node.
click to hide/show example
Region: eu-central-1
Image:
Os: centos7
HeadNode:
InstanceType: c5n.xlarge
Networking:
SubnetId: subnet-77daea63d414c9c4
Ssh:
KeyName: mykey
AllowedIps: 12.34.123.234/32
Dcv:
Enabled: true
AllowedIps: 12.34.123.234/32
CustomActions:
OnNodeConfigured:
Script: s3://cluster-utils/post-install.sh
Args:
- INSTALL_AMS=YES
- INSTALL_GUI_DEPS=YES
Iam:
S3Access:
- BucketName: cluster-utils
Scheduling:
Scheduler: slurm
SlurmQueues:
- Name: queue1
CapacityType: ONDEMAND
ComputeResources:
- Name: c5nxlarge
InstanceType: c5n.xlarge
DisableSimultaneousMultithreading: true
MinCount: 0
MaxCount: 10
- Name: c4xlarge
InstanceType: c4.xlarge
DisableSimultaneousMultithreading: true
MinCount: 0
MaxCount: 10
Networking:
SubnetIds:
- subnet-5208860694ca8109
SharedStorage:
- Name: ebs
  MountDir: /shared-ebs
  StorageType: Ebs
  EbsSettings:
    VolumeType: gp2
    Size: 64
    Encrypted: false
    DeletionPolicy: Delete
Note that you should of course use your own, preconfigured subnets and information such as ip addresses and S3 buckets.
Recommended reading
- The AMS installation guide covers all the basics about installation.
- The AMSjobs user manual describes in detail how to set up a queue.