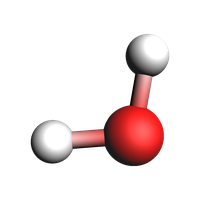
ChemicalSystem: Getting Started With AMS System Blocks
This example shows how to build a ChemicalSystem object and convert it to the text input in the AMS System block.
Initial imports
import scm.plams as plams
Elements, coordinates, lattice vectors, and charge
Manual system definition
from scm.base import ChemicalSystem

system = ChemicalSystem()
system.add_atom("O", coords=(0, 0, 0))
system.add_atom("H", coords=(0.172111370, 0.975304070, 0))
system.add_atom("H", coords=(-0.987455810, -0.075969620, 0))
To see the input that will be passed to AMS, create an AMSJob and print the input:
print(plams.AMSJob(molecule=system).get_input())
plams.view(system, guess_bonds=True, width=200, height=200)
System
   Atoms
      O 0 0 0
      H 0.17211137 0.97530407 0
      H -0.98745581 -0.07596962 0
   End
End

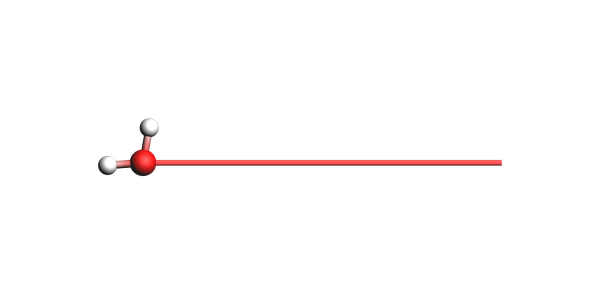
Lattice vectors: 1D-periodic
For periodic systems in 1 dimension, the lattice vector must be along the x direction (with 0 components along y and z)
from scm.base import Lattice

system.lattice = Lattice([[10, 0, 0]])
print(plams.AMSJob(molecule=system).get_input())
plams.view(
    system,
    guess_bonds=True,
    show_lattice_vectors=True,
    show_unit_cell_edges=False,
    padding=-3,
    width=600,
    height=300,
)
System
   Atoms
      O 0 0 0
      H 0.17211137 0.97530407 0
      H -0.98745581 -0.07596962 0
   End
   Lattice
      10 0 0
   End
End
Lattice vectors: 2D-periodic
For 2 dimensions, the two lattice vectors must lie in the xy plane (with 0 component along z).
from scm.base import Lattice

system.lattice = Lattice(
    [
        [10, 0, 0],
        [0, 11, 0],
    ]
)
print(plams.AMSJob(molecule=system).get_input())
plams.view(
    system,
    guess_bonds=True,
    show_lattice_vectors=True,
    show_unit_cell_edges=False,
    padding=-1,
    width=300,
    height=300,
)
System
   Atoms
      O 0 0 0
      H 0.17211137 0.97530407 0
      H -0.98745581 -0.07596962 0
   End
   Lattice
      10 0 0
      0 11 0
   End
End

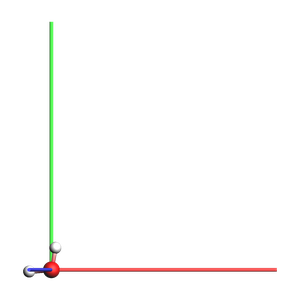
Lattice vectors: 3D-periodic
from scm.base import Lattice

system.lattice = Lattice([[10, 0, 0], [0, 11, 0], [-1, 0, 12]])
print(plams.AMSJob(molecule=system).get_input())
plams.view(
    system,
    guess_bonds=True,
    show_lattice_vectors=True,
    show_unit_cell_edges=False,
    padding=-2,
    width=300,
    height=300,
)
System
   Atoms
      O 0 0 0
      H 0.17211137 0.97530407 0
      H -0.98745581 -0.07596962 0
   End
   Lattice
      10 0 0
      0 11 0
      -1 0 11.999999999999998
   End
End
Delete lattice vectors
from scm.base import Lattice

system.lattice = Lattice()
print(plams.AMSJob(molecule=system).get_input())
plams.view(system, guess_bonds=True, width=200, height=200)
System
   Atoms
      O 0 0 0
      H 0.17211137 0.97530407 0
      H -0.98745581 -0.07596962 0
   End
End
Charge
system.charge = -1
print(plams.AMSJob(molecule=system).get_input())
System
   Atoms
      O 0 0 0
      H 0.17211137 0.97530407 0
      H -0.98745581 -0.07596962 0
   End
   Charge -1
End
To get the charge of a system, use system.charge.
my_charge = system.charge
print(f"The charge is {my_charge}")
The charge is -1.0
Unset the charge:
system.charge = 0

my_charge = system.charge
print(f"The charge is {my_charge}")
The charge is 0.0
Atomic properties: masses, regions, force field types …
In the AMS system block most atomic properties are given as a suffix at the end of the line.
To access an individual atom, use for example system.atoms[0], which corresponds to the first atom. The atoms array uses normal Python indexing, so the first atom has index 0.
Isotopes (atomic masses)
system.atoms[1].mass = 2.014
print(plams.AMSJob(molecule=system).get_input())
System
   Atoms
      O 0 0 0
      H 0.17211137 0.97530407 0 mass=2.014
      H -0.98745581 -0.07596962 0
   End
End
Regions
Regions are used for example to
set special basis sets on a subset of atoms, or
apply a thermostat in molecular dynamics to only a subset of atoms,
visualize atoms easily in the AMS GUI,
and much more!
Use the ChemicalSystem region methods to assign atoms to regions. In this way, one atom can belong to multiple regions.
system.add_atoms_to_region([0, 1, 2], "region1")
system.add_atom_to_region(2, "region2")
print(plams.AMSJob(molecule=system).get_input())
plams.view(system, guess_bonds=True, width=200, height=200, show_regions=True)
System
   Atoms
      O 0 0 0 region=region1
      H 0.17211137 0.97530407 0 mass=2.014 region=region1
      H -0.98745581 -0.07596962 0 region=region1,region2
   End
End
Force field types
Some force fields need to know the specific atom type and not just the chemical element. Use forcefield.type for this when you use the ForceField engine:
system.enable_atom_attributes("forcefield")
# these types would depend on what type of force field you use!
system.atoms[0].forcefield.type = "OW"
system.atoms[1].forcefield.type = "HW"
system.atoms[2].forcefield.type = "HW"
print(plams.AMSJob(molecule=system).get_input())
System
   Atoms
      O 0 0 0 forcefield.type=OW region=region1
      H 0.17211137 0.97530407 0 mass=2.014 forcefield.type=HW region=region1
      H -0.98745581 -0.07596962 0 forcefield.type=HW region=region1,region2
   End
End
Delete all atom-specific options
Reset the modified mass, remove all regions, and disable the forcefield atom attributes:
for atom in system:
    atom.mass = atom.element.mass

system.remove_all_regions()
system.disable_atom_attributes("forcefield")

print(plams.AMSJob(molecule=system).get_input())
System
   Atoms
      O 0 0 0
      H 0.17211137 0.97530407 0
      H -0.98745581 -0.07596962 0
   End
End
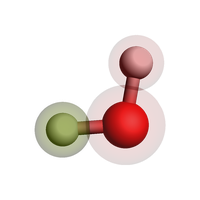
Bonds
Most methods (DFT, DFTB, ML Potential, ReaxFF) ignore any specified bonds.
When using force fields, you sometimes need to specify the bonds that connect atoms. Some force fields (UFF, GAFF) can automatically guess the correct types of bonds.
So most of the time you do not manually need to specify bonds.
If you need to specify bonds, it is easiest
to handle in the AMS GUI: use File -> Export Coordinates -> .in, and then load the file with
system = ChemicalSystem.from_in("my_file.in")to use the
from_smilesfunction to generate a system from SMILES code, for examplesystem = ChemicalSystem.from_smiles("O")for water.
The water molecule without bonds:
print(plams.AMSJob(molecule=system).get_input())
# in previous pictures in this notebook, we passed guess_bonds=True to the view() function to see the bonds
# without that argument, we see that there are in fact no bonds
plams.view(system, width=200, height=200)
System
   Atoms
      O 0 0 0
      H 0.17211137 0.97530407 0
      H -0.98745581 -0.07596962 0
   End
End

If you need to add bonds manually with ChemicalSystem you can do it as follows:
from scm.base import Bond

system.bonds.add_bond(0, 1, Bond(1.0))  # bond order 1.0
system.bonds.add_bond(0, 2, Bond(1.0))
print(plams.AMSJob(molecule=system).get_input())
plams.view(system, width=200, height=200)
System
   Atoms
      O 0 0 0
      H 0.17211137 0.97530407 0
      H -0.98745581 -0.07596962 0
   End
   BondOrders
      1 2 1
      1 3 1
   End
End

Multiple systems
Some tasks like NEB (nudged elastic band) require more than 1 system in the input file. This can be accomplished by using a Python dictionary.
In AMS,
the “main system” has no name. It should have the key
""(empty string) in the dictionary.every additional system needs to have a name, that is used as the key in the dictionary.
Let’s first define two ChemicalSystem objects:
from scm.base import ChemicalSystem

system1 = ChemicalSystem()
system1.add_atom("O", coords=(0, 0, 0))
system1.add_atom("H", coords=(1, 0, 0))
system1.add_atom("H", coords=(0, 1, 0))

system2 = ChemicalSystem()
system2.add_atom("O", coords=(0, 0, 0))
system2.add_atom("H", coords=(3.33333, 0, 0))
system2.add_atom("H", coords=(0, 5.555555, 0))
Then create the system_dict dictionary:
system_dict = {
    "": system1,  # main system, empty key (no name)
    "final": system2,  # for NEB, use "final" as the name for the other endpoint
}
Pass the system_dict as the molecule argument to AMSJob:
print(plams.AMSJob(molecule=system_dict).get_input())
System
   Atoms
      O 0 0 0
      H 1 0 0
      H 0 1 0
   End
End
System final
   Atoms
      O 0 0 0
      H 3.33333 0 0
      H 0 5.555555 0
   End
End
Above we see that the main system is printed just as before. A second system block “system final” is also added with system2.
See also
Python Script
#!/usr/bin/env python
# coding: utf-8

# ## Initial imports

import scm.plams as plams


# ## Elements, coordinates, lattice vectors, and charge

# ### Manual system definition

from scm.base import ChemicalSystem

system = ChemicalSystem()
system.add_atom("O", coords=(0, 0, 0))
system.add_atom("H", coords=(0.172111370, 0.975304070, 0))
system.add_atom("H", coords=(-0.987455810, -0.075969620, 0))


# To see the input that will be passed to AMS, create an AMSJob and print the input:

print(plams.AMSJob(molecule=system).get_input())
plams.view(system, guess_bonds=True, width=200, height=200, picture_path="picture1.png")


# ### Lattice vectors: 1D-periodic
#
# For periodic systems in 1 dimension, the lattice vector must be along the x direction (with 0 components along y and z)

from scm.base import Lattice

system.lattice = Lattice([[10, 0, 0]])
print(plams.AMSJob(molecule=system).get_input())
plams.view(
    system,
    guess_bonds=True,
    show_lattice_vectors=True,
    show_unit_cell_edges=False,
    padding=-3,
    width=600,
    height=300,
    picture_path="picture2.png",
)


# ### Lattice vectors: 2D-periodic
#
# For 2 dimensions, the two lattice vectors must lie in the xy plane (with 0 component along z).

from scm.base import Lattice

system.lattice = Lattice(
    [
        [10, 0, 0],
        [0, 11, 0],
    ]
)
print(plams.AMSJob(molecule=system).get_input())
plams.view(
    system,
    guess_bonds=True,
    show_lattice_vectors=True,
    show_unit_cell_edges=False,
    padding=-1,
    width=300,
    height=300,
    picture_path="picture3.png",
)


# ### Lattice vectors: 3D-periodic

from scm.base import Lattice

system.lattice = Lattice([[10, 0, 0], [0, 11, 0], [-1, 0, 12]])
print(plams.AMSJob(molecule=system).get_input())
plams.view(
    system,
    guess_bonds=True,
    show_lattice_vectors=True,
    show_unit_cell_edges=False,
    padding=-2,
    width=300,
    height=300,
    picture_path="picture4.png",
)


# ### Delete lattice vectors

from scm.base import Lattice

system.lattice = Lattice()
print(plams.AMSJob(molecule=system).get_input())
plams.view(system, guess_bonds=True, width=200, height=200, picture_path="picture5.png")


# ### Charge

system.charge = -1
print(plams.AMSJob(molecule=system).get_input())


# To get the charge of a system, use ``system.charge``.

my_charge = system.charge
print(f"The charge is {my_charge}")


# Unset the charge:

system.charge = 0

my_charge = system.charge
print(f"The charge is {my_charge}")


# ## Atomic properties: masses, regions, force field types ...
#
# In the AMS system block most atomic properties are given as a suffix at the end of the line.
#
# To access an individual atom, use for example ``system.atoms[0]``, which corresponds to the first atom. The ``atoms`` array uses normal Python indexing, so the first atom has index 0.

# ### Isotopes (atomic masses)

system.atoms[1].mass = 2.014
print(plams.AMSJob(molecule=system).get_input())


# ### Regions
#
# Regions are used for example to
#
# * set special basis sets on a subset of atoms, or
# * apply a thermostat in molecular dynamics to only a subset of atoms,
# * visualize atoms easily in the AMS GUI,
# * and much more!
#
# Use the ChemicalSystem region methods to assign atoms to regions. In this way, one atom can belong to multiple regions.

system.add_atoms_to_region([0, 1, 2], "region1")
system.add_atom_to_region(2, "region2")
print(plams.AMSJob(molecule=system).get_input())
plams.view(system, guess_bonds=True, width=200, height=200, show_regions=True, picture_path="picture6.png")


# ### Force field types
#
# Some force fields need to know the specific atom type and not just the chemical element. Use ``forcefield.type`` for this when you use the ForceField engine:

system.enable_atom_attributes("forcefield")
# these types would depend on what type of force field you use!
system.atoms[0].forcefield.type = "OW"
system.atoms[1].forcefield.type = "HW"
system.atoms[2].forcefield.type = "HW"
print(plams.AMSJob(molecule=system).get_input())


# ### Delete all atom-specific options
# Reset the modified mass, remove all regions, and disable the forcefield atom attributes:

for atom in system:
    atom.mass = atom.element.mass

system.remove_all_regions()
system.disable_atom_attributes("forcefield")

print(plams.AMSJob(molecule=system).get_input())


# ## Bonds
#
# Most methods (DFT, DFTB, ML Potential, ReaxFF) ignore any specified bonds.
#
# When using force fields, you sometimes need to specify the bonds that connect atoms. Some force fields (UFF, GAFF) can automatically guess the correct types of bonds.
#
# So **most of the time you do not manually need to specify bonds**.
#
# If you **need** to specify bonds, it is easiest
#
# * to handle in the AMS GUI: use File -> Export Coordinates -> .in, and then load the file with ``system = ChemicalSystem.from_in("my_file.in")``
# * to use the ``from_smiles`` function to generate a system from SMILES code, for example ``system = ChemicalSystem.from_smiles("O")`` for water.

# The water molecule without bonds:

print(plams.AMSJob(molecule=system).get_input())
# in previous pictures in this notebook, we passed guess_bonds=True to the view() function to see the bonds
# without that argument, we see that there are in fact no bonds
plams.view(system, width=200, height=200, picture_path="picture7.png")


# If you need to add bonds manually with ChemicalSystem you can do it as follows:

from scm.base import Bond

system.bonds.add_bond(0, 1, Bond(1.0))  # bond order 1.0
system.bonds.add_bond(0, 2, Bond(1.0))
print(plams.AMSJob(molecule=system).get_input())
plams.view(system, width=200, height=200, picture_path="picture8.png")


# ## Multiple systems
#
# Some tasks like NEB (nudged elastic band) require more than 1 system in the input file. This can be accomplished by using a Python dictionary.
#
# In AMS,
#
# * the "main system" has no name. It should have the key ``""`` (empty string) in the dictionary.
#
# * every additional system needs to have a name, that is used as the key in the dictionary.
#
# Let's first define two ``ChemicalSystem`` objects:

from scm.base import ChemicalSystem

system1 = ChemicalSystem()
system1.add_atom("O", coords=(0, 0, 0))
system1.add_atom("H", coords=(1, 0, 0))
system1.add_atom("H", coords=(0, 1, 0))

system2 = ChemicalSystem()
system2.add_atom("O", coords=(0, 0, 0))
system2.add_atom("H", coords=(3.33333, 0, 0))
system2.add_atom("H", coords=(0, 5.555555, 0))


# Then create the ``system_dict`` dictionary:

system_dict = {
    "": system1,  # main system, empty key (no name)
    "final": system2,  # for NEB, use "final" as the name for the other endpoint
}


# Pass the ``system_dict`` as the ``molecule`` argument to ``AMSJob``:

print(plams.AMSJob(molecule=system_dict).get_input())


# Above we see that the main system is printed just as before. A second system block "system final" is also added with ``system2``.