2.3. Import training data (GUI)
This tutorial will show you all the ways that you can import finished reference calculations (or results from experiment) into the ParAMS GUI.
For how to do the same using scripting, see Import Training Data with ResultsImporter.
There are several ways to import reference data:
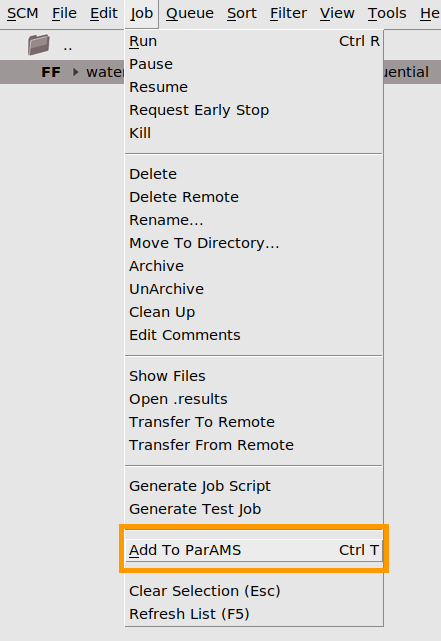
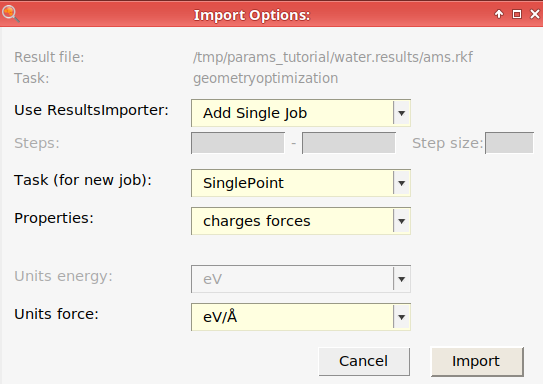
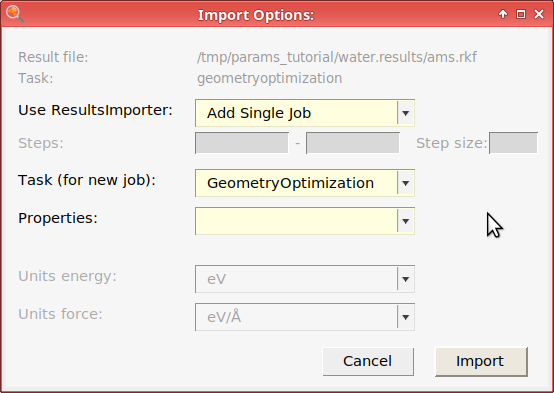
Choosing Job → Add to ParAMS (Ctrl-T) in AMSjobs or Jobs → Add Job (choosing an ams.rkf, OUTCAR, or quantum-espresso.out file) in the ParAMS GUI. This brings up a ResultsImporter dialog and is the recommended way to import a job into ParAMS. In the dialog you can directly import results like energies, forces, stress tensor, charges, bond scans, angle scans, volume scans, and any other PES scan. It is recommended to use the dialog to import those results.
Choosing File → Add to ParAMS from AMSinput or AMSmovie. This will import the structure (and if using AMSinput also some calculation settings).
Selecting a previously imported job in the ParAMS GUI and choosing Training Set → Add → Bonds (or similar). This is the recommended way to import geometric data like bond lengths, angles, dihedrals, cell lengths, and cell volume. You can also use it for importing experimental reference results.
Important
Importing geometric data only makes sense for jobs with Task (for new job) Geometry Optimization.
2.3.1. Choose preferred units
ParAMS supports several commonly used units, so that you can work with the units that are common in your field.
When you import a job (see below), the import dialog contains a choice of units.
2.3.2. Reference calculation #1: Geometry optimization of a water molecule
 panel
panelwater.ams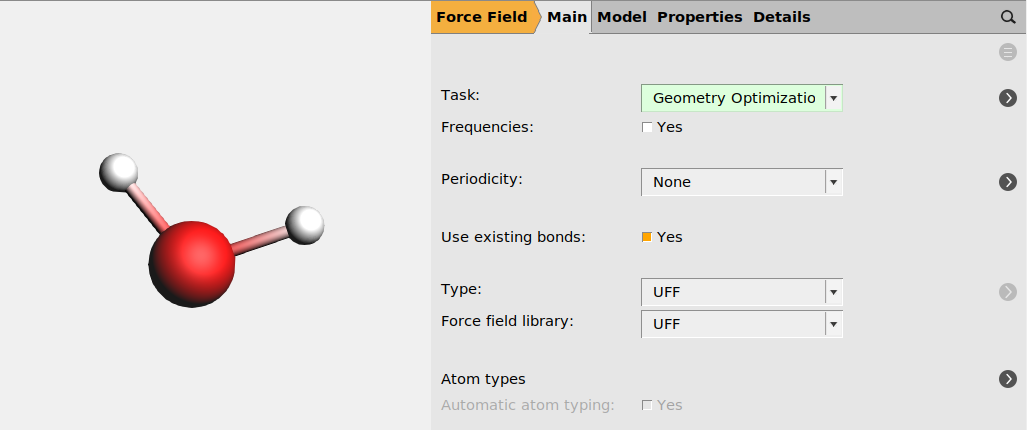
2.3.3. Charges and forces
In the ParAMS GUI, you can now see
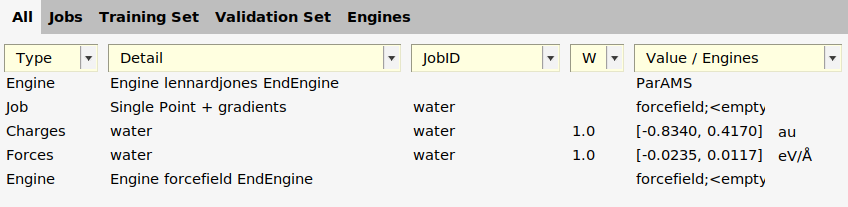
On the Jobs panel is a job called
waterwith TaskSinglePoint.On the Training Set panel are two entries
ChargesandForcesfor the jobwater.On the Engines panel is a new entry
forcefield;<emptySettings>;. This contains the settings used for the reference calculation.
Tip
Select a job in the Jobs panel or a training set entry in the Training Set panel, and switch to the Info panel on the bottom to see some details. To edit the details, double-click in the Details column in the upper table.
Tip
On the Training Set panel, the W column contains the weight of the training set entry. You can edit it in the table. The Value column contains shows the minimum and maximum value.
2.3.4. Bonds and angles
To train to geometry data like bonds or angles, you should set the Task (for new job) to Geometry Optimization when importing a job.
This adds the job water (or water_1 if you first added the charges and forces - job names need to be unique).
It is marked in red because it is not yet used in any training set entry.
On the Jobs panel, click twice at the job name and change the name to water_geoopt.

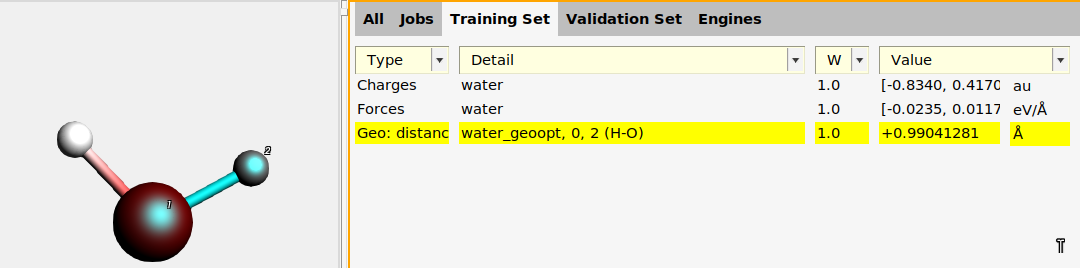
Then, add one of the O-H bond lengths:
water_geoopt job on the Jobs panel.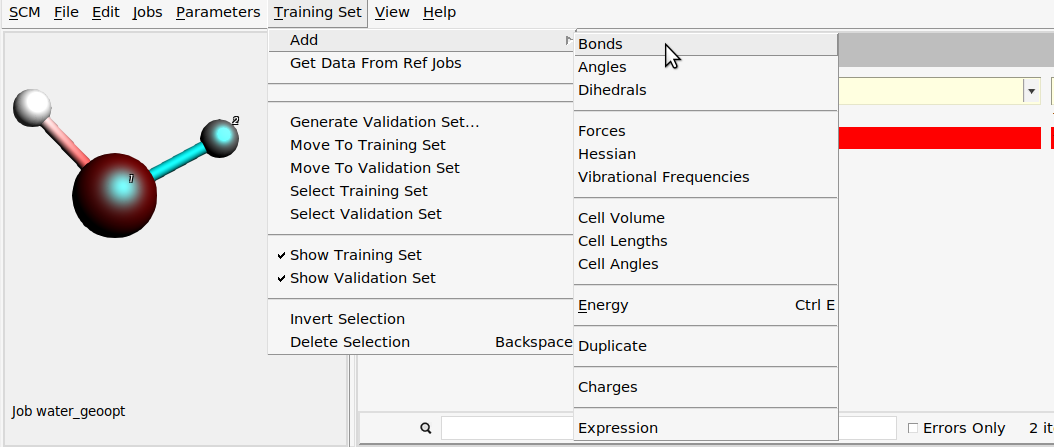
To add the H-O-H angle:
water_geoopt job on the Jobs panel.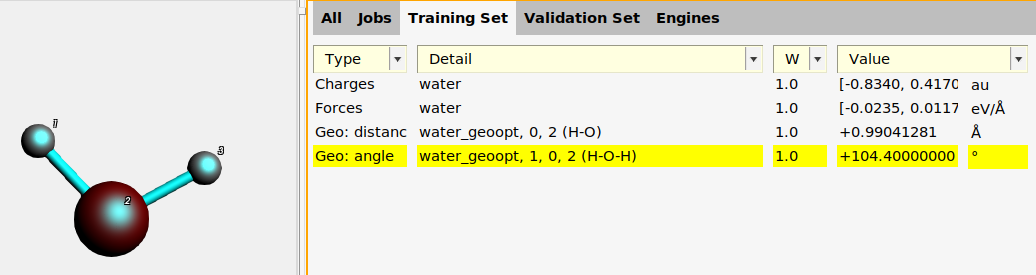
You can also add dihedral angles in a similar way (for molecules with at least 4 atoms).
2.3.5. PES scans: bond scan, angle scan, or volume scan
Bond scan: See the ReaxFF (basic): H₂O bond scan tutorial
Angle scan: in the same way as importing a bond scan
Dihedral scan: in the same way as importing a bond scan
Volume scan: in the same way as importing a bond scan. See also the GFN1-xTB: Lithium fluoride tutorial.
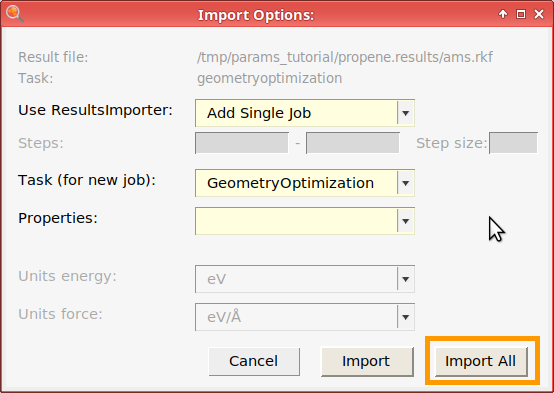
For the above type of PESScan reference calculations, there are two options for Use ResultsImporter in the import dialog:
Add Single Job. This, together with Task (for new job) → PESScan, sets up an equivalent PESScan to be run during the parameter optimization. This is illustrated in the ReaxFF (basic): H₂O bond scan tutorial.
Add PESScan Singlepoints. This, together with Task (for new job) → SinglePoint sets up several singlepoint calculations on the frames from the PESScan to be run during the parameter optimization. This is illustrated in the GFN1-xTB: Lithium fluoride tutorial.
Add Single Job |
Add PESScan Singlepoints |
|
|---|---|---|
Task (for new job) |
PESScan |
SinglePoint |
Properties |
pes |
energy, relative_energies, forces, stresstensor |
Recommended |
yes |
no (unless necessary) |
Speed |
slow |
fast |
Number of new jobs |
1 |
= number of frames |
Energy curves in GUI |
yes |
no |
Tutorial example |
The pes property for Add Single Job is equivalent to the
relative_energies property for Add PESScan Singlepoints. They extract
the relative energy of the different frames (by default, relative to the
minimum energy in the scan). It is the fundamental property to extract from a
PES Scan (bond scan, angle scan, volume scan).
With Add PESScan Singlepoints, you can also add the forces and
stresstensor for each frame, but only if you enabled the Save results for
all PES points option when running the PES Scan. See the GFN1-xTB: Lithium fluoride
tutorial for an example.
With Add Single Job (and Task PESScan), many constrained geometry optimizations are performed for each set of parameters, which can be time-consuming. With Add PESScan Singlepoints, only single-point calculations are performed, which is usually faster.
With Add Single Job (and Task PESScan, pes extractor), the GUI will
give useful plots of the energy vs. the scan coordinate for both the reference
values and calculated values during the parametrization. For this reason, we
recommend to use this option and not Add PESScan Singlepoints.
2.3.6. Energies
For Lennard-Jones, ReaxFF, and DFTB you typically only want to fit relative energies (reaction energies), not absolute energies. This is because the absolute energy levels are different for different engines.
Important
Note that the absolute energy will be added if you select select the
property energy in the Results Importer dialog, or if you choose
Training Set → Add → Energy. Make sure to edit the entry to become a
relative energy instead!
As an example, let’s add the reaction energy for propene combustion: C₃H₆(g) + (9/2) O₂(g) → 3 CO₂(g) + 3 H₂O(g). First, run the reference calculations and import the jobs:
propene.ams, o2.ams, and co2.ams, and run them.
Then, add the reaction energy. You can either work out the stoichiometric coefficients yourself, or use the automatic Balance feature of ParAMS (see below).
co2 job, and choose Training Set → Add → Energy (Ctrl-E).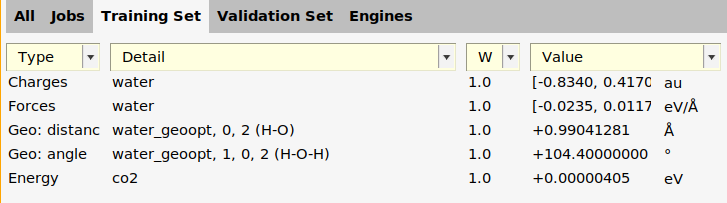
co2.energy("co2")+energy("w and press TAB multiple times. This will cycle through all jobs starting with “w”. If you followed both the Charges and forces and Bonds and angles steps, there will be two jobs water and water_geoopt.energy("co2")+energy("water_geoopt")-1.0*energy("propene")-energy("o2") (start with the products and positive signs, and end with the reactants and negative signs). Write an explicit 1.0* before energy("propene")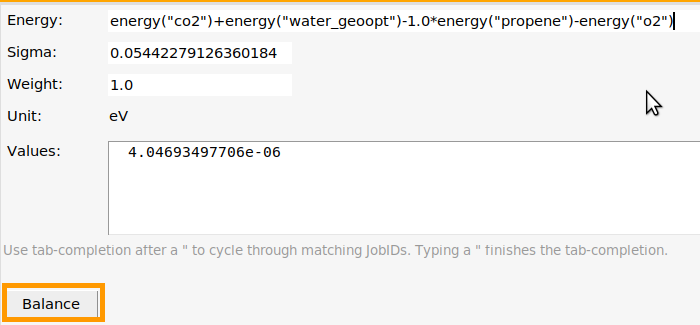
+3.0*energy("co2")+3.0*energy("water")-1.0*energy("propene")-4.5*energy("o2"). Here the coefficient before propene is 1.0 as specified in the previous step.

Tip
To recalculate reference values after you have modified an expression you can also use the Training Set → Get Data From Ref Jobs option.
This is the reaction energy calculated at the UFF (ForceField) level of theory - it is very far from reality! For a more realistic reference value, run the reference calculations with DFT (ADF, BAND, or Quantum ESPRESSO) instead.
For PES Scans, the pes and relative_energies properties extract relative energies from the PES scan.
See also
The Import experimental formation enthalpy into ParAMS of the GFN1-xTB tutorial explains how to import experimental reaction energies (i.e., not calculated from reference jobs), and also has some tips for reaction energies in general.
2.3.7. Import a molecular dynamics trajectory
You can import frames from a Molecular Dynamics trajectory. Typically, running a molecular dynamics is a simple way of sampling some distorted structures, and can be used for fitting especially the forces but also relative energies.
There are two ways:
Run the MD simulation directly with the reference method (often DFT, i.e. you would run ab initio MD).
Run the MD simulation with a parametrized method, use the Replay task of the AMS Driver to recalculate some of the frames with DFT, and add only the DFT-calculated frames to ParAMS. In particular, because training sets often need to be expanded iteratively, the initial MD simulation could be run with your current force field, if you have already run a parametrization.
2.3.7.1. Reference calculation #2: MD simulation of liquid Ar
panel.Ar32.xyz next to the Task
70.5 fs.10.2000 K.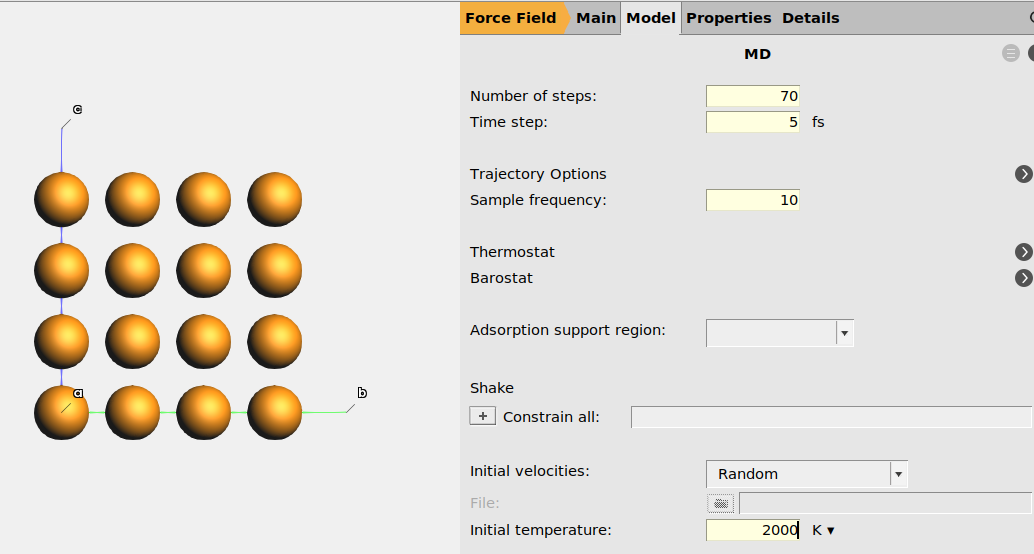 next to Trajectory Options
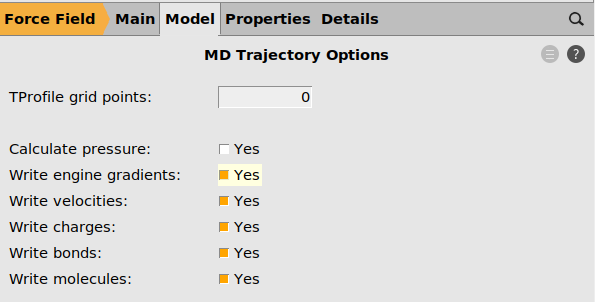
uff_mdYou can select the job in AMSjobs and select SCM → Movie to visualize the trajectory.
Note
The initial velocities are random. The trajectory (and the forces on the atoms) will be different when you run the calculation yourself compared to the screenshots in this tutorial.
2.3.7.2. MD with reference method
Here, we will use the previous calculation as an MD simulation with the
reference method. Normally, you would have instead used DFT (on the  or
or  panels, or using Quantum ESPRESSO or VASP) for the MD simulation.
uff_md job in AMSjobs.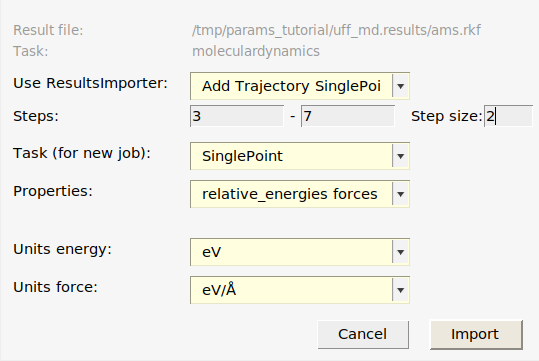
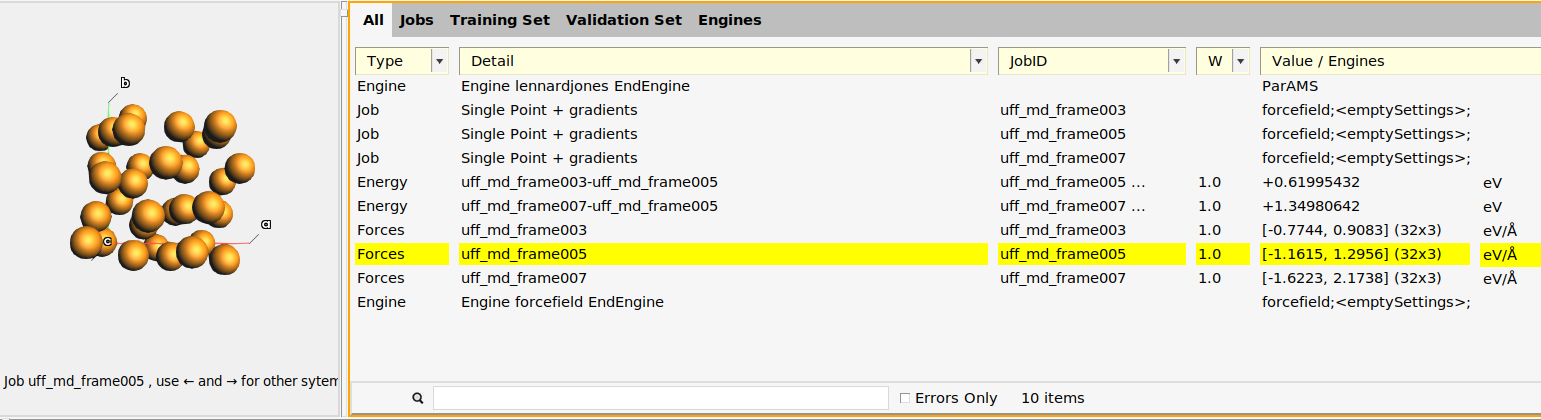
This adds:
Three Singlepoint jobs to the job collection:
uff_md_frame003,uff_md_frame005, anduff_md_frame007, containing the structures of those frames.Two relative energy expressions:
uff_md_frame003-uff_md_frame005anduff_md_frame007-uff_md_frame005, with the corresponding reference values. In this case, frame 5 had the lowest energy so the relative energies are taken relative to that frame. In your case, frame 3 or 7 may be the lowest energy frame.Three forces expressions for the three frames. If you select a force entry and switch to the Info panel in the bottom table, you can see the individual force components.
An Engine containing the settings for the reference engine (in this case UFF, which corresponds to an empty [default]
Engine ForceFieldblock).
2.3.7.3. MD with fast method followed by Replay with reference method
The task Replay performs a series of single-point calculcations on structures taken from an ams.rkf file, for example a molecular dynamics trajectory.
Here, we will use the GFN1-xTB (DFTB) method to recalculate some of the points from the molecular dynamics trajectory generated with UFF. If you do not have a DFTB license, you could instead run the Replay calculation with BAND, or even ForceField (UFF).
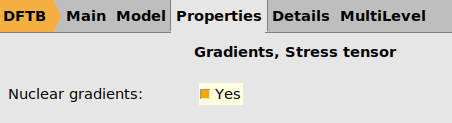
 panel (or use a different engine if you do not have a DFTB license) arrow next to the Task
ams.rkf file from the previous job. It is located inside the folder uff_md.results.3 5 7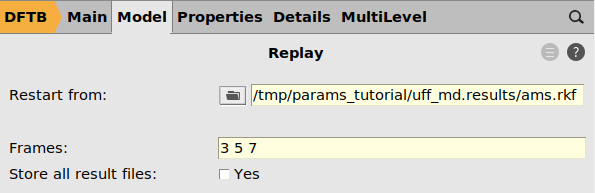
Ar32.ams and run the job.When the calculation has finished, import it into ParAMS:
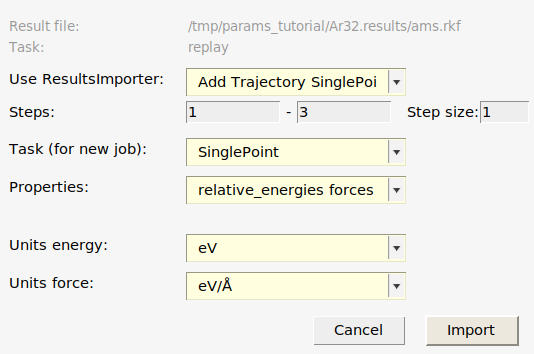
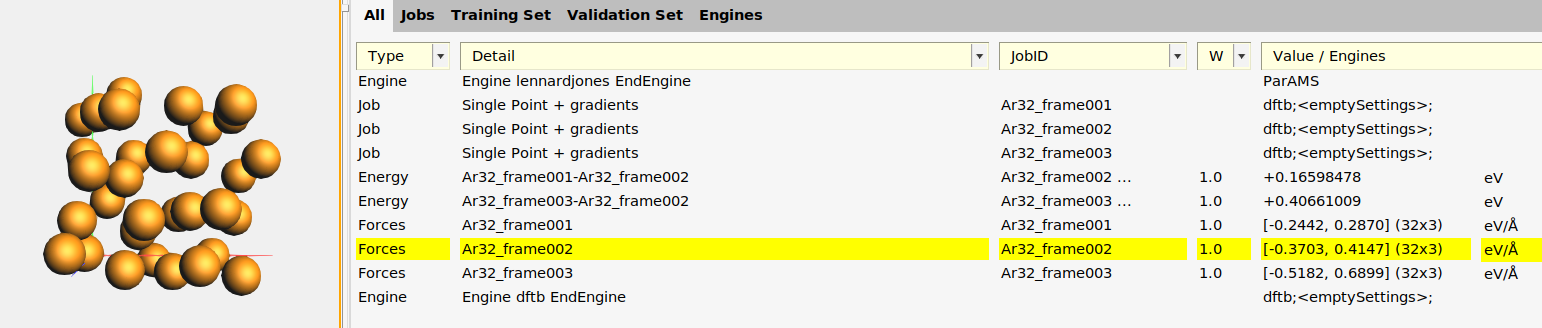
This adds:
Three Singlepoint jobs to the job collection:
Ar32_frame001,Ar32_frame002, andAr32_frame003, containing the structures of those frames.Two relative energy expressions:
Ar32_frame001-Ar32_frame002andAr32_frame003-Ar32_frame002, with the corresponding reference values. In this case, frame 2 had the lowest energy so the relative energies are taken relative to that frame. In your case, frame 1 or 3 may be the lowest energy frame.Three forces expressions for the three frames. If you select a force entry and switch to the Info panel in the bottom table, you can see the individual force components.
An Engine containing the settings for the reference engine (in this case GFN1-xTB, which corresponds to an empty [default]
Engine DFTBblock).
The above is exactly how the training data for the Getting Started: Lennard-Jones tutorial was created.
2.3.8. Import a structure and settings from AMSinput
You can import a structure and AMS driver settings (for example, geometry optimization settings) from AMSinput. This can be useful if you
want to import an experimental structure
want to import a structure optimized with a DFT code not supported by ParAMS (codes other than AMS, VASP, or Quantum ESPRESSO)
See the Import experimental formation enthalpy into ParAMS section of the GFN1-xTB tutorial for an example of how to do this.
Note
You often want to set Task GeometryOptimization when importing from AMSinput. You should then also set the Maximum number of iterations on the Details → Geometry Optimization panel and the Pretend converged option on the Expert AMS panel. See the Frequently Asked Questions for details.
2.3.9. Import VASP or Quantum ESPRESSO calculations
You can import results from VASP or Quantum ESPRESSO single points, geometry optimizations, and molecular dynamics simulations.
Note
If you ran VASP via AMS (the  in AMSinput), there should be an ams.rkf file in the results directory. In that case, follow the previous instructions on this page.
For VASP calculations run outside AMS, open the ParAMS GUI and select Jobs →
Add Job, select the OUTCAR file from the file dialog. This will convert the
VASP output to AMS format - it may take a while. Then, you will see the
familiar results importer dialog, where you can choose either Add Single
Job or Add Trajectory Singlepoints, and select properties including
energy, forces, and stresstensor.
For Quantum ESPRESSO calculations, open the ParAMS GUI and select Jobs → Add
Job, select the jobname.out file from the file dialog. This will convert
the output to AMS format - it may take a while. Then, you will see the
familiar results importer dialog, where you can choose either Add Single
Job or Add Trajectory Singlepoints, and select properties including
energy, forces, and stresstensor.
Note
If you run Quantum ESPRESSO outside the AMS GUI, it is necessary to
redirect the standard output to a file with a name ending in .out
when you run the calculation.
For example:
/path/to/pw.x < jobname.in > jobname.out
See also
The page AMS, VASP, Quantum ESPRESSO, and Gaussian reference data explains where the results from the conversion to AMS format are stored, and the meaning of the added engines to the engine collection. In particular, the added engines cannot be used for new reference calculcations.