5.2. Benchmarks from literature (advanced)
This tutorial shows you how you can
Use any AMS engine(s) to evaluate a dataset and compare to reference values using Task: SinglePoint

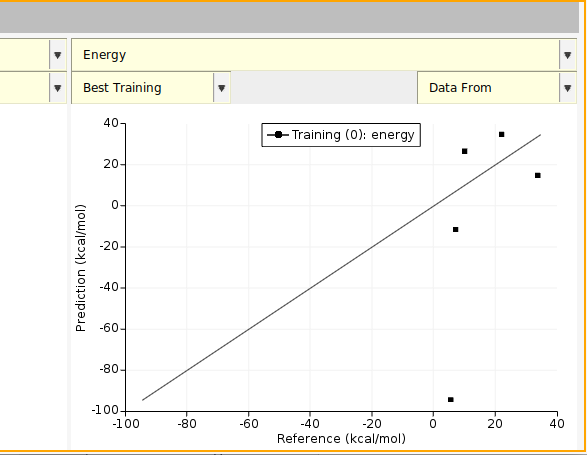
Fig. 5.2 An example reaction energy from the ISOL benchmark. The predictions were evaluated with DFT (PBE/TZP). This tutorial will instead use UFF, which gives much worse predictions.
Here, ParAMS is not used for parametrization but simply as a convenient tool to run multiple calculations and compare the results to reference values.
This is accomplished by
running a
 calculation (SinglePoint documentation)
using the
NoParametersparameter interface (Parameters → No Parameters)setting the ParAMS Engine settings
We will use ParAMS together with an AMS engine to evaluate a subset of the ISOL isomerization benchmark set. The reference energies were evaluated at the CCSD(T)-F12a/aDZ level of theory.
The example files are stored in $AMSHOME/scripting/scm/params/examples/benchmark.
5.2.1. Create the reference values
The reference values and corresponding jobs need to follow the ParAMS format (job_collection.yaml, training_set.yaml, etc.)
Note
The reference values are
stored in training_set.yaml, even though no “training”
will take place.
In the example directory $AMSHOME/scripting/scm/params/examples/benchmark all files that you need for this tutorial have already been created. The below tabs give some hints on how you can create your own files.
If you want to use ParAMS and AMS to create your reference data, see the Generate reference values tutorial.
This will automatically create the data in a format that ParAMS can read.
See the Import training data (GUI) tutorial. You can
import data from finished jobs, or
just import structures and manually add training data with reference values from literature.
See for example Import experimental formation enthalpy into ParAMS.
The create_input_files.py gives an example of how to use a Results Importer to add literature reaction energies for structures from .xyz files:
def get_jobs_and_training_set(engine_collection: EngineCollection, engine_id: str = "UFF"):
    # initialize ResultsImporter
    ri = ResultsImporter(settings={"units": {"energy": "kcal/mol"}})
    ri.job_collection.engines = engine_collection

    # directory with xyz files e_3.xyz, p_3.xyz, e_9.xyz, p_9.xyz etc.
    xyzdir = os.path.expandvars("$AMSHOME/scripting/scm/params/examples/benchmark/ISOL6")

    # id vs. reference-value (kcal/mol)
    reactions = {"3": 9.77, "9": 21.76, "10": 6.83, "13": 33.52, "14": 5.3}

    for rid, reference in reactions.items():
        reactant = Molecule(f"{xyzdir}/e_{rid}.xyz")
        product = Molecule(f"{xyzdir}/p_{rid}.xyz")
        # add the jobs to the job collection
        # and reaction energy to training set
        ri.add_reaction_energy(reactants=[reactant], products=[product], normalization="r0", reference=reference)

        # access the added jobs and set the corresponding engine id
        for jid in ri.data_set[-1].jobids:
            ri.job_collection[jid].extra_engine = engine_id

    ri.store(backup=False, store_settings=False)
The above also sets the extra_engine (known as ParAMS Engine in the GUI) which is explained in the next section.
5.2.2. Set the engine settings
$AMSHOME/scripting/scm/params/examples/benchmark/job_collection.yamlThere are five reaction energies in the data set.
The ParAMS Engine for all jobs is set to UFF. This means that all jobs will be evaluated with the engine whose ID is UFF.
This tutorial comes with a few different engines pre-defined. UFF is one of them.
This brings up the Engine settings that will be used during the calculation. To modify the settings for the UFF engine, either
Type the settings directly in the text box
Use the Edit in AMSInput button
In this case, there is no need to make any changes.
If you want, you can change the engine for all the jobs:
The rest of this tutorial uses the UFF ParAMS engine.
The engine settings are stored in an Engine Collection. From create_input_files.py:
def get_engine_collection():
    ec = EngineCollection()

    s = Settings()
    s.input.ReaxFF.ForceField = "CHON-2019.ff"
    s.input.ReaxFF.TaperBO = "Yes"
    ec.add_entry("ReaxFF:CHON-2019", Engine(s))

    s = Settings()
    s.input.ForceField.Type = "UFF"
    ec.add_entry("UFF", Engine(s))

    s = Settings()
    s.input.MLPotential.Model = "ANI-2x"
    ec.add_entry("ANI-2x", Engine(s))

    s = Settings()
    s.input.DFTB.Model = "GFN1-xTB"
    ec.add_entry("DFTB", Engine(s))

    s = Settings()
    s.input.ADF.XC.GGA = "PBE"
    s.input.ADF.Basis.Type = "TZP"
    s.input.ADF.Unrestricted = "No"
    ec.add_entry("PBE_TZP", Engine(s))

    s = Settings()
    s.input.ADF.XC.GGA = "PBE"
    s.input.ADF.Basis.Type = "TZP"
    s.input.ADF.Unrestricted = "Yes"
    s.input.ADF.SpinPolarization = 1.0
    ec.add_entry("PBE_TZP_spin1", Engine(s))

    return ec
Each engine has an ID (ReaxFF:CHON-2019, UFF, etc.). The
extra_engine attribute of a job in the job collection should be the
ID of the engine that you want to use for that job (see previous
section).
ParAMS also requires a parameter interface, but we only want to use the engine settings from the engine collection. This can be accomplished with a No parameters (empty interface) interface:
def get_parameter_interface():
    interf = NoParameters()
    interf.yaml_store("parameter_interface.yaml")
5.2.3. Run the SinglePoint job
panelThis brings up the SinglePoint settings. Here, we will just use the default settings.
From run.py, a job can be run run via:
#!/usr/bin/env amspython
import argparse
import os
from scm.params import ParAMSJob


def parse_args() -> argparse.Namespace:
    parser = argparse.ArgumentParser()
    parser.add_argument(
        "--no-plot",
        action="store_true",
        help="Disable displaying the correlation plot of predicted vs. reference energies.",
    )
    return parser.parse_args()


def main() -> None:
    args = parse_args()
    examples_dir = os.path.expandvars("$AMSHOME/scripting/scm/params/examples/benchmark")
    job = ParAMSJob.from_yaml(examples_dir)
    job.settings.input.Task = "SinglePoint"
    job.run()
    res = job.results.get_data_set_evaluator().results["energy"]

    print(res.detailed_string())
    print("---------")
    print("Mean absolute error: {:.2f} {}".format(res.mae, res.unit))

    if not args.no_plot:
        import matplotlib.pyplot as plt

        job.results.plot_simple_correlation("energy", training_set=True, validation_set=False)
        plt.show()


if __name__ == "__main__":
    main()
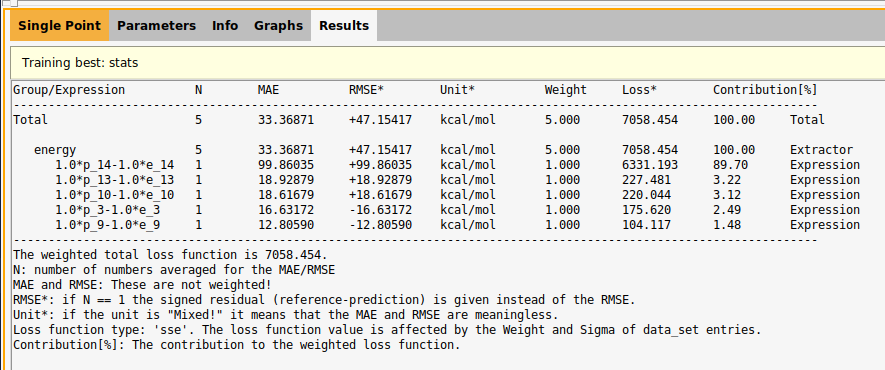
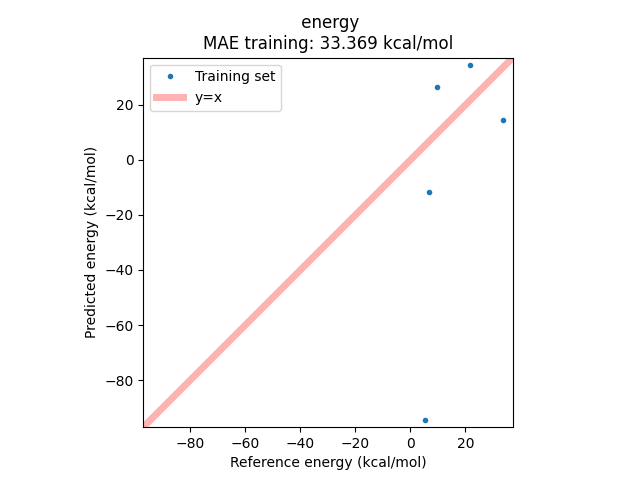
5.2.4. Results from the SinglePoint calculation
The results from a SinglePoint are similar to those from an Optimization.
This shows a scatter plot of predicted vs. reference energies.
Here, you see for example that the mean absolute error (MAE) for the predicted isomerization energies is 33.4 kcal/mol.
See:
Running $AMSBIN/amspython run.py produces the output table:
#Reference     Prediction     Unit           Sigma    Weight    WSE*      Row*  Col*  Expression
#------------------------------------------------------------------------------------------------------------------------
+9.77          +26.40          kcal/mol       1.2550   1.0000    175.620   0     0     +1.0*energy('p_3')-1.0*energy('e_3')
+21.76         +34.57          kcal/mol       1.2550   1.0000    104.117   0     0     +1.0*energy('p_9')-1.0*energy('e_9')
+6.83          -11.79          kcal/mol       1.2550   1.0000    220.044   0     0     +1.0*energy('p_10')-1.0*energy('e_10')
+33.52         +14.59          kcal/mol       1.2550   1.0000    227.481   0     0     +1.0*energy('p_13')-1.0*energy('e_13')
+5.30          -94.56          kcal/mol       1.2550   1.0000    6331.193  0     0     +1.0*energy('p_14')-1.0*energy('e_14')
#------------------------------------------------------------------------------------------------------------------------
#WSE*: Weighted Squared Error: weight*([reference-prediction]/sigma)**2
#Row*, Col*: For scalars both numbers are 0. For 1D arrays Col is 0.
---------
Mean absolute error: 33.37 kcal/mol
and the scatter plot of predicted vs. reference energies:
5.2.5. More SinglePoint possibilities
Use different engine settings for different jobs (e.g., different spin polarizations or k-space samplings)
If your SinglePoint job exits before all jobs have finished, you can restart using the Load jobs from option in the
tab.To change from one engine to the other, it is easiest to just open a text editor and do a search-and-replace on
ExtraEngineID: UFFto for exampleExtraEngineID: DFTBin job_collection.yaml.