Run a ParAMSJob for Lennard-Jones
Get started with ParAMS by training a Lennard-Jones potential with a Python script. jobs.
Overview
ParAMS uses PLAMS to run jobs through Python. PLAMS offers many functions for handling jobs. To run jobs through PLAMS, you can either
use the
$AMSBIN/plamsprogramuse the
$AMSBIN/amspythonprogram. You must then callinit()before running jobs.
Here, we use the second approach.
# first import all plams and params functions and classes
from scm.plams import *
from scm.params import *
import os

# call PLAMS init() to set up a new directory for running jobs
# set path=None to use the current working directory
# the default folder name is 'plams_workdir'
init(path="/tmp", folder="demo_paramsjob")
PLAMS working folder: /tmp/demo_paramsjob
Below it is shown how to set up and run a ParAMS job using a params.in file taken from the Getting Started tutorial. The job should take less than 2 minutes to finish.
# load all the settings for the job from a "params.in" file
params_in_file = os.path.expandvars("$AMSHOME/scripting/scm/params/examples/LJ_Ar/params.in")
job = ParAMSJob.from_inputfile(params_in_file)

# set a name for the job
job.name = "LJ_Ar"

# run the job
job.run();
[22.03|13:45:53] JOB LJ_Ar STARTED
[22.03|13:45:54] JOB LJ_Ar RUNNING
[22.03|13:46:17] JOB LJ_Ar FINISHED
[22.03|13:46:17] JOB LJ_Ar SUCCESSFUL
To find out where the job and its results are stored:
print(f"The job was run in: {job.path}")
print(f"Contents of the job directory: {os.listdir(job.path)}")
print(f"The results are stored in: {job.results.path}")
print(f"Contents of the results directory: {os.listdir(job.results.path)}")
The job was run in: /tmp/demo_paramsjob/LJ_Ar
Contents of the job directory: ['LJ_Ar.out', 'LJ_Ar.run', 'LJ_Ar.dill', 'results', 'LJ_Ar.in', 'LJ_Ar.err']
The results are stored in: /tmp/demo_paramsjob/LJ_Ar/results
Contents of the results directory: ['settings_and_initial_data', 'optimization']
Access the results
When a job has finished, you would like to access the results. The job may have been run via the GUI or with the ParAMSJob as above. Typically, you would write another Python script and load the finished (or running) job:
# job = ParAMSJob.load_external(results_dir)

# in this example it would be

# job = ParAMSJob.load_external('/tmp/demo_paramsjob/LJ_Ar/results')
In this tutorial, there is no need to explicitly load the job again with load_external since the job was run in the same script, so the lines above are commented out.
The results can be accessed with job.results, which is of type ParAMSResults.
Below we print a table with the initial and best Lennard-Jones parameters eps and sigma, and the corresponding loss function values.
# compare the results
initial_interface = job.results.get_parameter_interface(source="initial")
initial_loss = job.results.get_loss(source="initial")
best_interface = job.results.get_parameter_interface(source="best")
best_loss = job.results.get_loss(source="best")

print("{:12s} {:>12s} {:>12s} {:>12s}".format("", "eps", "rmin", "loss"))
print(
    "{:12s} {:12.7f} {:12.5f} {:12.5f}".format(
        "Initial", initial_interface["eps"].value, initial_interface["rmin"].value, initial_loss
    )
)
print(
    "{:12s} {:12.7f} {:12.5f} {:12.5f}".format(
        "Best", best_interface["eps"].value, best_interface["rmin"].value, best_loss
    )
)
                      eps         rmin         loss
Initial         0.0003000      4.00000    572.18867
Best            0.0001961      3.65375      0.00251
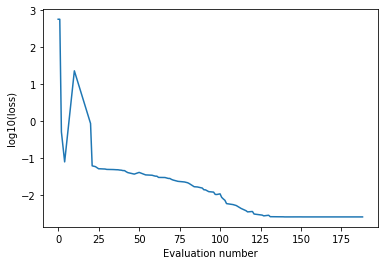
Let’s also plot the running loss function value vs. evaluation number:
import matplotlib.pyplot as plt
import numpy as np

evaluation, loss = job.results.get_running_loss()
plt.plot(evaluation, np.log10(loss), "-")
plt.ylabel("log10(loss)")
plt.xlabel("Evaluation number");
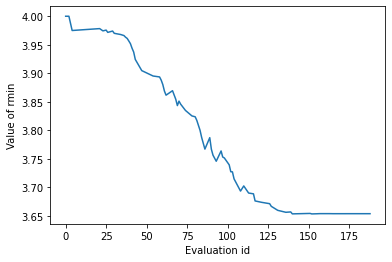
To see the parameter values at different evaluations:
evaluation, parameters = job.results.get_running_active_parameters()
plt.plot(evaluation, parameters["rmin"])
plt.xlabel("Evaluation id")
plt.ylabel("Value of rmin");
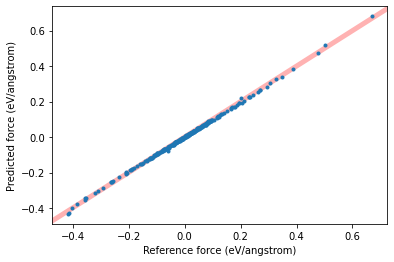
You can plot a scatter plot of reference vs. predicted forces with the help of the get_data_set_evaluator() function, which returns a DataSetEvaluator:
dse = job.results.get_data_set_evaluator()
forces = dse.results["forces"]
plt.plot(forces.reference_values, forces.predictions, ".")
plt.xlabel(f"Reference force ({forces.unit})")
plt.ylabel(f"Predicted force ({forces.unit})")
plt.xlim(auto=True)
plt.autoscale(False)
plt.plot([-10, 10], [-10, 10], linewidth=5, zorder=-1, alpha=0.3, c="red")
plt.show();
Call PLAMS finish()
If you used PLAMS to run jobs, the finish() function should be called at the end, if init() was called at the beginning.
finish()
[22.03|13:46:17] PLAMS run finished. Goodbye
See also
Python Script
#!/usr/bin/env python
# coding: utf-8

# ## Overview
#
# ParAMS uses PLAMS to run jobs through Python. PLAMS offers many functions for handling jobs. To run jobs through PLAMS, you can either
#
# * use the ``$AMSBIN/plams`` program
# * use the ``$AMSBIN/amspython`` program. You must then call ``init()`` before running jobs.
#
# Here, we use the second approach.

# first import all plams and params functions and classes
from scm.plams import *
from scm.params import *
import os

# call PLAMS init() to set up a new directory for running jobs
# set path=None to use the current working directory
# the default folder name is 'plams_workdir'
init(path="/tmp", folder="demo_paramsjob")


# Below it is shown how to set up and run a ParAMS job using a ``params.in`` file taken from the Getting Started tutorial. The job should take less than 2 minutes to finish.

# load all the settings for the job from a "params.in" file
params_in_file = os.path.expandvars("$AMSHOME/scripting/scm/params/examples/LJ_Ar/params.in")
job = ParAMSJob.from_inputfile(params_in_file)

# set a name for the job
job.name = "LJ_Ar"

# run the job
job.run()
# To find out where the job and its results are stored:

print(f"The job was run in: {job.path}")
print(f"Contents of the job directory: {os.listdir(job.path)}")
print(f"The results are stored in: {job.results.path}")
print(f"Contents of the results directory: {os.listdir(job.results.path)}")


# ### Access the results

# When a job has finished, you would like to access the results. The job may have been run via the GUI or with the ParAMSJob as above. Typically, you would write **another** Python script and load the finished (or running) job:

# job = ParAMSJob.load_external(results_dir)

# in this example it would be

# job = ParAMSJob.load_external('/tmp/demo_paramsjob/LJ_Ar/results')


# In this tutorial, there is no need to explicitly load the job again with ``load_external`` since the job was run in the same script, so the lines above are commented out.
#
# The results can be accessed with ``job.results``, which is of type ``ParAMSResults``.
#
# Below we print a table with the initial and best Lennard-Jones parameters eps and sigma, and the corresponding loss function values.

# compare the results
initial_interface = job.results.get_parameter_interface(source="initial")
initial_loss = job.results.get_loss(source="initial")
best_interface = job.results.get_parameter_interface(source="best")
best_loss = job.results.get_loss(source="best")

print("{:12s} {:>12s} {:>12s} {:>12s}".format("", "eps", "rmin", "loss"))
print(
    "{:12s} {:12.7f} {:12.5f} {:12.5f}".format(
        "Initial", initial_interface["eps"].value, initial_interface["rmin"].value, initial_loss
    )
)
print(
    "{:12s} {:12.7f} {:12.5f} {:12.5f}".format(
        "Best", best_interface["eps"].value, best_interface["rmin"].value, best_loss
    )
)


# Let's also plot the running loss function value vs. evaluation number:

import matplotlib.pyplot as plt
import numpy as np

evaluation, loss = job.results.get_running_loss()
plt.plot(evaluation, np.log10(loss), "-")
plt.ylabel("log10(loss)")
plt.xlabel("Evaluation number")
plt.gcf().savefig("picture1.png")
plt.clf()


# To see the parameter values at different evaluations:

evaluation, parameters = job.results.get_running_active_parameters()
plt.plot(evaluation, parameters["rmin"])
plt.xlabel("Evaluation id")
plt.ylabel("Value of rmin")
plt.gcf().savefig("picture2.png")
plt.clf()


# You can plot a scatter plot of reference vs. predicted forces with the help of the ``get_data_set_evaluator()`` function, which returns a ``DataSetEvaluator``:

dse = job.results.get_data_set_evaluator()
forces = dse.results["forces"]
plt.plot(forces.reference_values, forces.predictions, ".")
plt.xlabel(f"Reference force ({forces.unit})")
plt.ylabel(f"Predicted force ({forces.unit})")
plt.xlim(auto=True)
plt.autoscale(False)
plt.plot([-10, 10], [-10, 10], linewidth=5, zorder=-1, alpha=0.3, c="red")
plt.show()
plt.gcf().savefig("picture3.png")
plt.clf()


# ### Call PLAMS finish()
#
# If you used PLAMS to run jobs, the ``finish()`` function [should be called at the end](../../plams/general.html#running-plams), if ``init()`` was called at the beginning.

finish()