Reaction Boost (targeted MD): bond-making and breaking
Fig. 34 H₂O + propene → 1-propanol → H₂O + propene → 2-propanol
Important
This tutorial requires AMS2024 or later.
The reaction boost (targeted MD) feature can be used to gradually transform one system into another during molecular dynamics.
This feature can be used, for example, to
sample an interesting range of structures for training machine learning potentials,
get reasonable initial guesses for transition states
In this tutorial we will set the reaction boost method to Pair, which means
that the method will see which bonds need to break and form to go from reactant
to product, and apply moving restraints on those bonds to gradually break and form them.
This can push the simulation over the (possibly large) reaction barriers.
The reaction boost method cannot generally be used to discover the “correct” or lowest-barrier reaction mechanism. For discovering new reaction mechanisms, see the PES Exploration and ACE Reaction tutorials.
If the applied restraints are mild enough then the path from reactant to product may be close to the minimum energy path. However, there is no guarantee that this is the case. To closer sample the minimum energy path, see the Nudged Elastic Band (NEB) tutorial.
Note
The reaction boost method is quite different from the similarly named bond boost method.
In bond boost, if specific local motifs are identified during the simulation then restraints are added. When applying this method, you do not know what the end product will look like and the goal is to get the final structure.
In reaction boost (this tutorial), the restraints are essentially defined through the input structures. When applying this method, you already know what the end product will look like and the goal is to get intermediate structures.
Set up the calculation
MD_ReactionBoost.runYou can also find this file in $AMSHOME/examples/AMS/MD_ReactionBoost.
You will get a warning to double-check your input, since importing .run
files into AMSinput is not 100% reliable. We will go through all the input in
more detail below.
Tip
If you manually set up your own systems, the order of the atoms must be the same for all structures, similar to setting up NEB or PES Exploration calculations.
The easiest way to ensure this is to
import/draw the initial structure
Select → Select all
Edit → Copy
Edit → New Molecule
Edit → Paste
Manually move the atoms to form the target structure
Additionally it is possible to use reactmap to find the mapping between atoms in the different structures.
Engine settings
The example loads the ReaxFF engine using the CHO.ff force field.
Feel free to modify the engine settings, especially if you do not have a ReaxFF license.
If you change the engine, you may need to set Task to Molecular Dynamics again.
Further down below we will change the engine to the MLPotential AIMNet2-wB97MD3 in order to also visualize uncertainties in the calculated energies during the trajectory.
Input systems
This shows all four input structures:
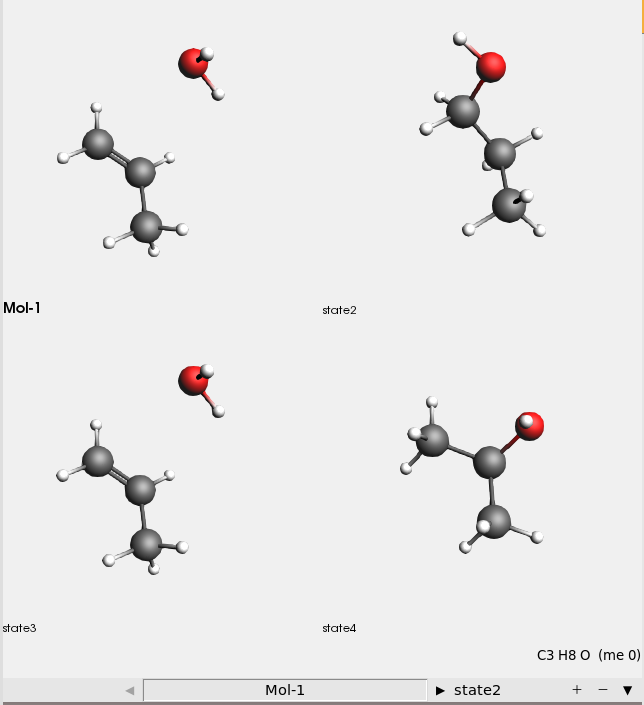
There are four input structures:
Mol-1: H₂O + propene
state2: 1-propanol
state3: H₂O + propene (identical to Mol-1)
state4: 2-propanol
The reaction boost method will transform the Mol-1 (H₂O+propene) system first into 1-propanol, then back to H₂O + propene, and finally into 2-propanol.
Tip
In this tutorial we do multiple transformations in a single simulation. However, this can lead to problems if one of the transformations is not successful.
Often, it is more reliable to just do a single transformation (to have two input structures instead of four) for Reaction Boost simulations.
Molecular dynamics settings
 button next to Task: Molecular Dynamics
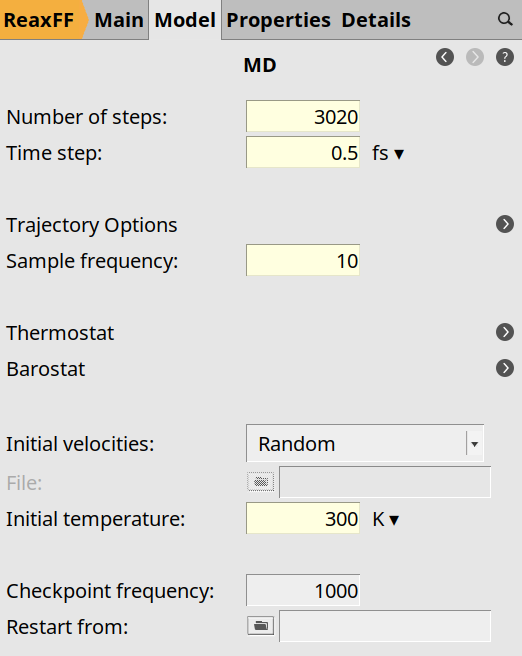
Here you see that the number of steps is set to 3020, the time step to
0.5 fs, the sample frequency to 10 (save structure every 10 frames),
and the initial temperature is 300 K.
next to Thermostat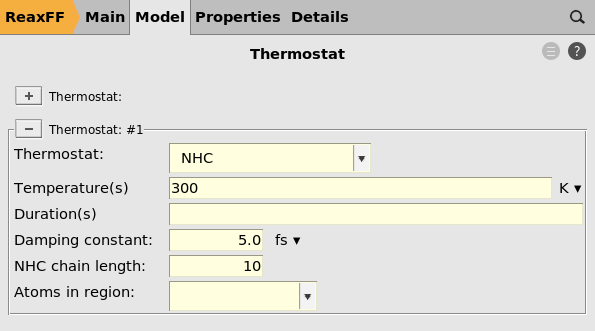
Here you see that there is a thermostat of type NHC with temperature 300 K, with a damping constant of 5.0 fs.
Note
When using reaction boost, the temperature can rise significantly. Therefore the damping constant is set to a very small value of 5.0 fs in order to quickly cool down the system if it heats up.
For normal equilibration MD simulations you should never set the damping constant to such a small value!
To not sample too distorted structures, you may also consider setting the temperature to
a lower value (for example, 100 K).
Reaction boost settings
Reaction boost has many input options. Below is an explanation of the most important ones.
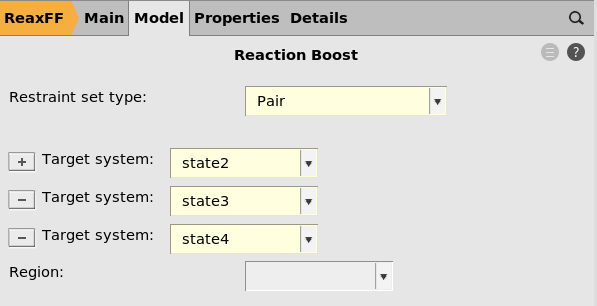
Restraint type
When restraint type is set to Pair, it means that restraints are
applied to make or break individual bonds.
These restraints thus act on internal coordinates, so it does not matter, for example, how the input structures are rotated relative to each other.
It does matter what the bond lengths are, since the restraints will be applied to match the bond length in the target structure. Therefore, it’s usually a good idea to preoptimize the structure using the same engine settings as during the MD.
For restraint type RMSD, see the other Reaction Boost tutorial.
Target systems
You can add or remove target systems by clicking the  and
and  buttons.
The order in which the target systems are visited during the MD is determined by the order in the panel on the right, not the order of the input systems in the 3D area on the left.
Make sure that all systems except one is listed in the target systems. The initial structure for the MD is the system not listed among the Target systems.
Here the Target systems are state2, state3, state4. This means that
the initial structure will be Mol-1.
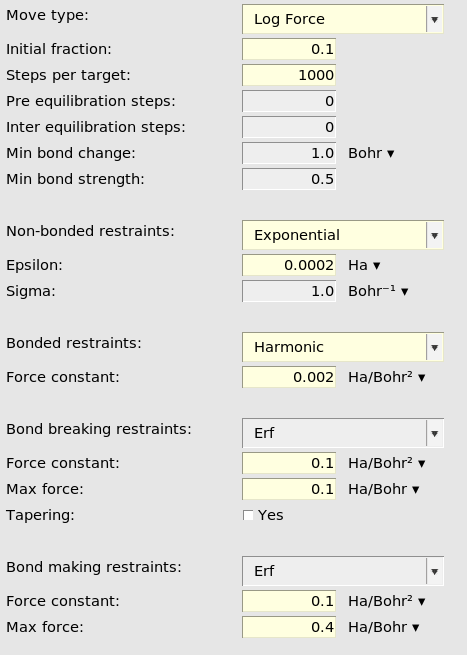
General reaction boost settings
See the reaction boost (targeted MD) AMS documentation for details about all of these input options.
When Move type is set to LogForce, like here, it means that the forces will
gradually be increased. The magnitude of the force depends on both the MD step
and how far away from the target structure the current structure is.
Initial fraction set to 0.1 means that the log force will be 10% of the final
(maximum) value at the very first step.
Steps per target specifies how many MD steps to do for each target system.
Here it is set to 1000. Since there are 3 target systems the reaction boost
will be active for a total of 3000 MD steps. In the general MD panel, the
number of steps was 3020. This means that the last 20 steps of the MD
simulation are not affected by reaction boost but behave like a normal NVT
simulation.
Reaction boost restraint types and settings
Non-bonded restraints (optional): These restraints make sure that no
unwanted new bonds are formed during the MD. By setting Exponential, a
repulsive potential is added between all atoms that are not bonded in the
initial structure and not bonded in the target structure.
Bonded restraints (optional): These restraints make sure that bonds that
are not intended to break do not break. By setting Harmonic, a harmonic
potential keeps all atoms that are bonded in the initial structure and that are
not supposed to break during the simulation intact.
Bond breaking restraints (recommended if at least 1 bond breaks): By
setting Erf a bond-breaking force is added to the bonds that are supposed
to break. In this case, the maximum applied force is 0.1 hartree/bohr.
Bond making restraints (recommended if at least 1 bond forms): By setting
Erf a bond-making force is added to the bonds are supposed to form. In this
case, the maximum applied force is 0.4 hartree/bohr.
There are also other restraint types. See the documentation for details.
Tip
If your intended transformation is not successful, you may consider increasing the bias by for example increasing the force constant, the max force, or number of steps.
Save and run the job
Save and run the job. If you use the ReaxFF engine it should only take a few seconds to finish.
Open the trajectory in AMSmovie to visualize the results. It should look something like this:
Visualize energy uncertainties with AIMNet2 ML Potential
The new AIMNet2 ML potential models in AMS2024 can calculate energy uncertainties that can be visualized during the MD simulation.
This will download and install the AIMNet2 models from the SCM servers. It may take a while to complete the installation.
MD_ReactionBoost.run to
to 
The job will take a few minutes to finish
Note that the Energy shown includes the restraint energies and kinetic energy. Typically, it’s more useful to look at the “engine energy”, which is potential energy calculated by the engine (without restraints and kinetic energy).
In this graph, you can see the calculated energy uncertainty as a shaded red region around the line. It is easier to see if you zoom in a bit.
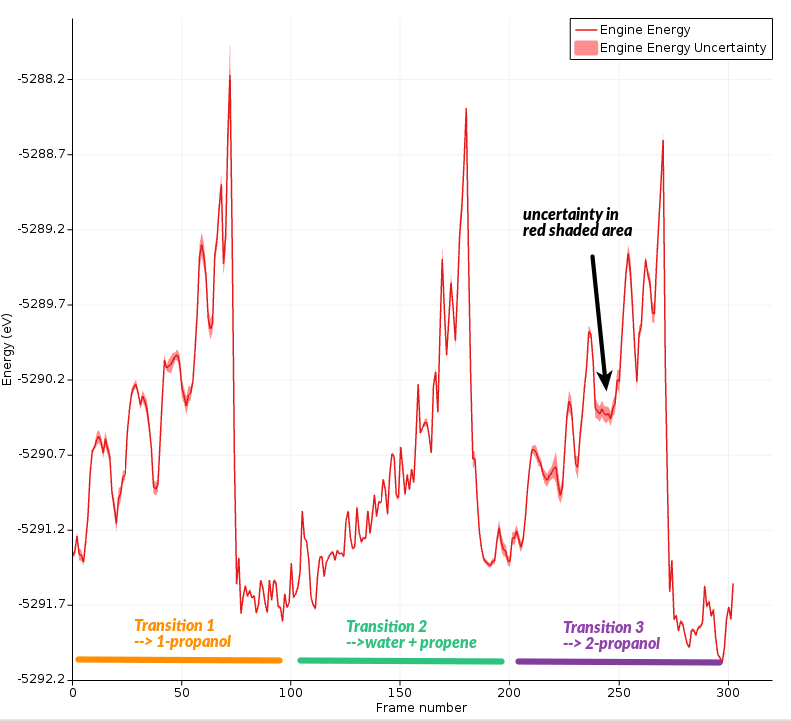
You can also plot the uncertainty in its own graph:
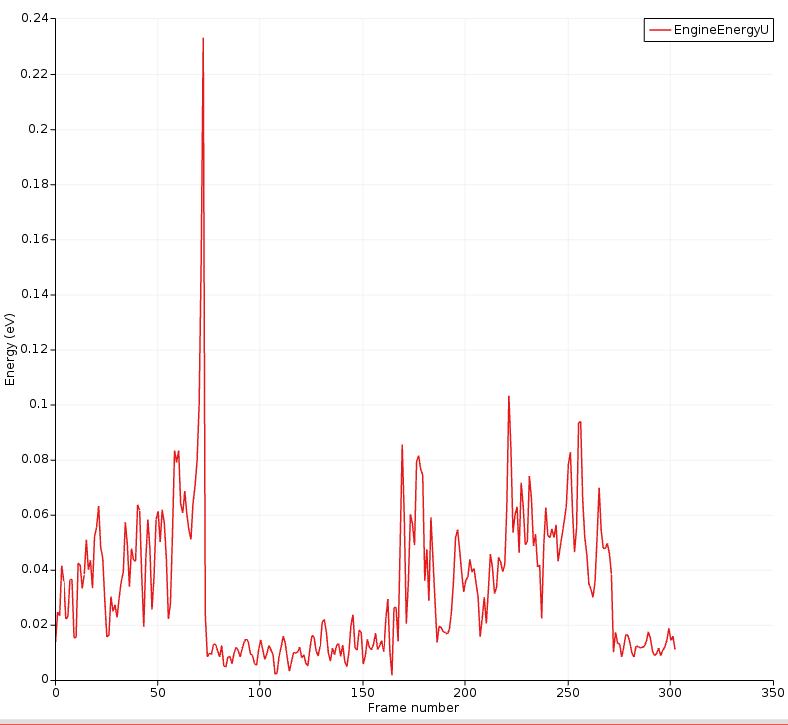
Here, you can clearly see that the energy uncertainty is higher when the molecules are separate.
The highest uncertainty is obtained during the transition into 1-propanol.