The Molecule Gun
This tutorials will help you with setting up a molecule gun from within the GUI. We will see how the molecule gun can be used to shoot molecules on surfaces.
See also
The bouncing buckyball
In this tutorial we will be modeling the impact of a C60 buckyball on a graphene sheet:

Setting up the system
The setup of the system consists of three steps:
- Creating a graphene sheet from graphite
- Adding a buckyball
- Mapping the setup to the ReaxFF (0..1) unit cell
Let us begin by creating a graphene sheet
- Start up ADFInput1. Switch to ReaxFF:
 →
→  2. In the Main ReaxFF panel click on the magnifying glass
 3. Search for
graphiteand select Graphite from the crystal compounds

The graphite unit cell shown in the GUI window consists of two graphene layers but we only need one layer:
- Select the upper two atoms and press the DEL (or backspace) button on your keyboard

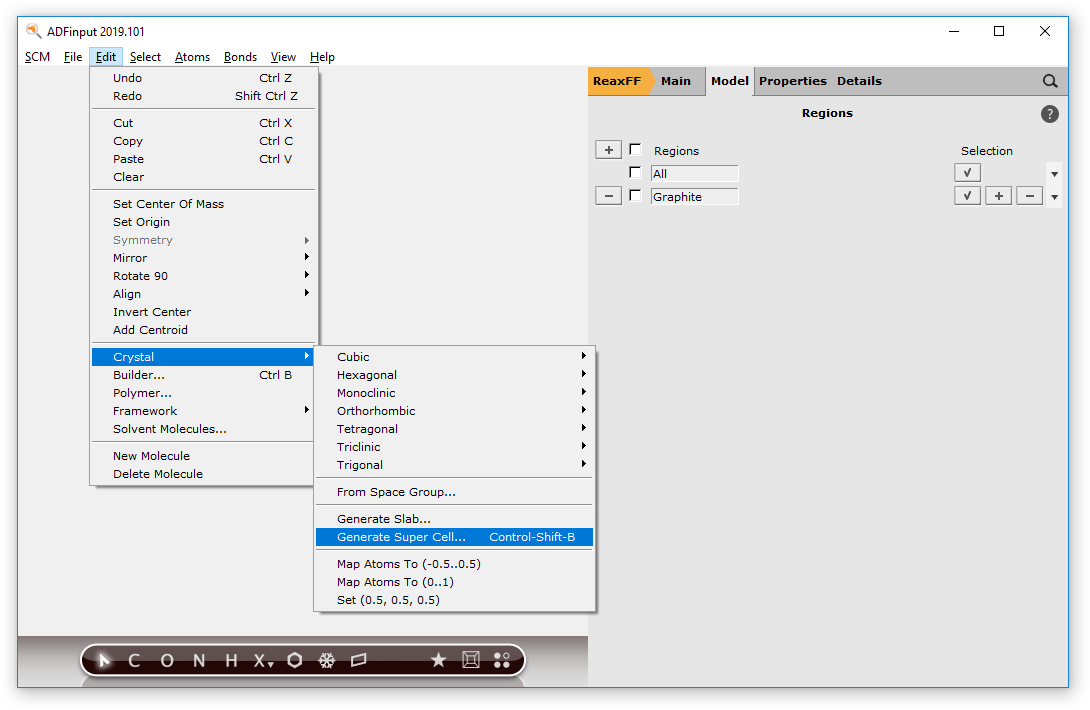
Next we create a super cell using the Crystal tools:
- 1. Click on the Edit menu next to the SCM logo on the top2. Select Crystal → Generate Super Cell3. In the pop-up window enter
20,20,1on the diagonal
At this point we have created a graphene sheet, but still need to increase the size of the periodic box otherwise the buckyball won’t fit into the box. Let’s first show the lattice vectors in the GUI:
- Click on the View menu in the top panelSelect Periodic → Show Lattice Vectors
Increase the length of the z-vector:
- 1. In the main ReaxFF panel select Model → Lattice2. Change the value of the z-vector to
42

Now that we adjusted the size of the simulation box we can add the buckyball from the compounds database:
- 1. In the Main ReaxFF panel click on the magnifying glass2. Enter
buckyballinto the search field and select C60: Buckyball

The buckyball will be selected automatically.
- Use your mouse to drag the buckyball above the graphene sheet.
The last step now consists in mapping your system to the ReaxFF unit cell.
Note
The default periodic display of the GUI uses a -0.5..0.5 convention of the lattice vectors as opposed to 0..1 in ReaxFF. The Molecule Gun will miss the target if the atoms are not mapped to the ReaxFF unit cell.
First select only the buckyball then set the direction of view along the z-axis:
- Click on the View menu next in the top panelSelect View → View direction → Along Z-AxisMake sure the buckyball is inside the space spanned by the lattice vectors,i.e. it is not intercepting the z-axis anymore (see next image)

If this step is not taken, the next step - mapping to the ReaxFF cell - will result in a split-up buckyball. To map this system to the ReaxFF cell:
- 1. Click in empty space to clear the selection2. Select Edit → Crystal → Map atoms to (0..1)

Note that all atoms are now contained inside the space spanned by the lattice vectors:

Setting up the calculation
In the next steps we are setting up the calculation details. First we choose a force field and change the preset from the canonical (NVT) to the microcanonical (NVE) ensemble:
Note
The thermostats used in NVT runs can affect the overall velocity of the added particle.
- In the ReaxFF Main panel:1. Click on the folder icon next to Force field and select C.ff2. From the Methods menu Select NVE

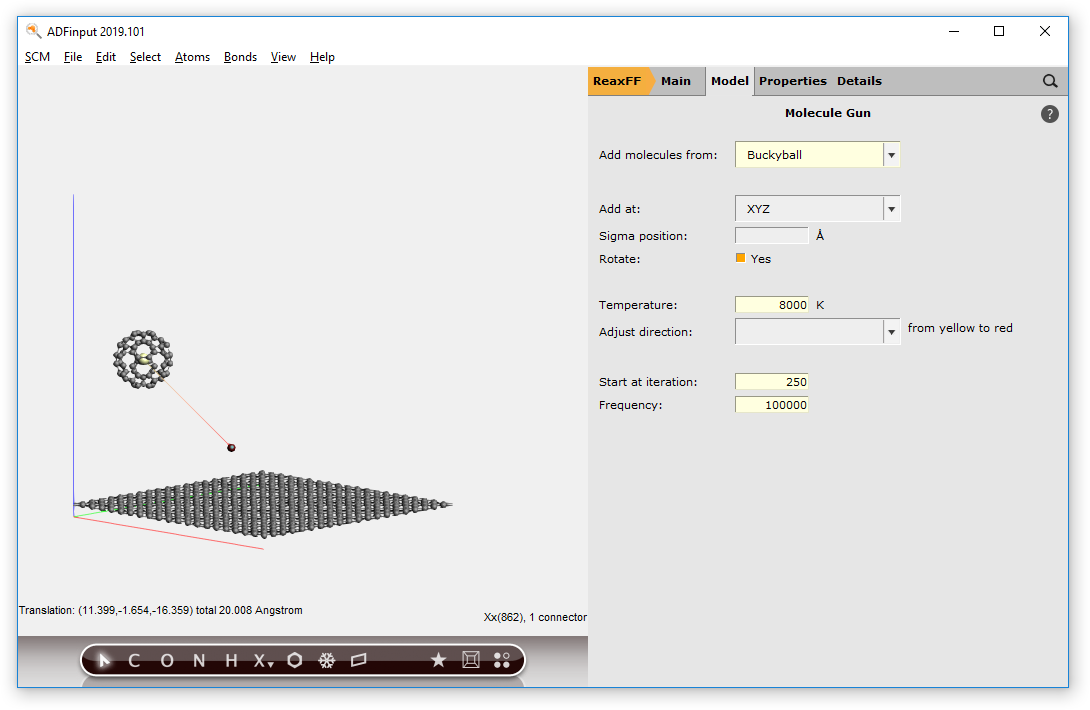
Next we set up the Molecule Gun:
- In the ReaxFF panel:Select Model → Molecule Gun

The first information we need to supply is which particle should be the one that is shot. This is done by assigning particles to a region and passing the region identifier to the Molecule Gun:
- Click on the menu Add molecules from and select Buckyball

Tip
Any imported structure from the structure database is automatically assigned to a region as in the present case. Click on New Region to create any other regions.
The molecule display window will show two dummy atoms at the buckyball. The slightly bigger yellow dummy atom marks the starting position of the particle while the red dummy atom is used for aiming:
- Use your mouse to select the red dummy atomDrag it towards the graphene sheet

Note
The distance between the yellow and red dummy atoms will not affect the starting velocity. Their sole purpose is the definition of a direction.
After having set the direction of the shot we can define the initial velocity and rate at which particles will be added. Let’s request an overall initial velocity that corresponds to a temperature of 8000K and request only one shot at timestep 250 of the trajectory:
- 1. In the field Temperature enter
80002. In the field Start at iteration enter2503. In the field Frequency enter100000
Running the calculation and visualizing the results
We are ready to run the calculation:
- Click on File → Save as…Run the calculation with File → RunClick on SCM → Movie to visualize the trajectory
The buckyball will appear at timestep 250 on the position defined by the yellow dummy atom. It’s initial velocity will follow the path set by the yellow and red dummy atoms while the overall velocity corresponds to 8000K. The impact will show slightly later - depending on your aiming - at approx. timestep 900:
